Creating a true communal feast is less about floral arrangements and more about spatial engineering.
- Banquet tables are more space-efficient but introduce logistical challenges like leg placement and platter service that must be solved.
- A successful design uses a “service highway” for platters and a “phased tablescape” that evolves with the meal.
Recommendation: Prioritize table width (at least 36-48 inches) for family-style service and always map out table leg placements before designing your seating chart.
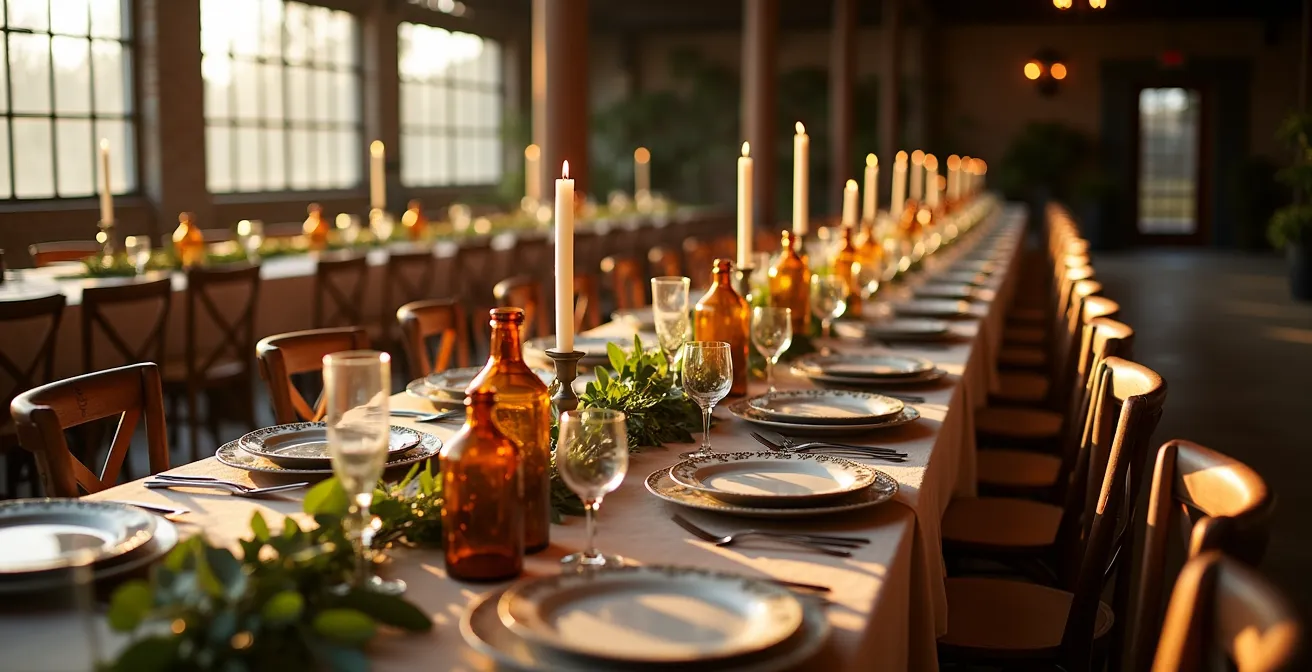
The vision is powerful: a long, grand banquet table, brimming with food and laughter, where guests mingle freely. It’s this promise of a “family-style” connection that draws many couples to long table layouts over traditional rounds. The focus often drifts to aesthetics—the rustic charm of a farm table, the dramatic sweep of a continuous garland, the warm flicker of countless candles. These elements are beautiful, but they are not the foundation of a successful communal meal.
The magic of a shared feast quickly crumbles when guests are knocking knees with table legs, when servers have no path to clear plates, or when the glorious shared platters have nowhere to land. The atmosphere suffers when the design is impractical. The secret to achieving that vibrant, communal feeling isn’t found in replicating a Pinterest photo; it’s rooted in structural design and logistical planning. It requires thinking like an engineer, not just a decorator.
This guide deconstructs the banquet table layout from a functional perspective. We will move beyond the superficial and into the mechanics of what makes a shared dining experience work. We’ll analyze the critical measurements, the strategic trade-offs, and the flow of service that transform a static tablescape into a dynamic, comfortable, and truly communal celebration.
To navigate this structural approach, we will explore the core components of banquet table design, from the foundational space calculations to the intricate logistics of a multi-course service. The following sections provide a complete roadmap for engineering your perfect communal feast.
Summary: How to Style Banquet Tables for a Communal “Feast” Atmosphere?
- Do Banquet Tables Really Save Space Compared to Rounds?
- Tablecloth or Runner: Which Works Best on a Farm Table?
- Continuous Garland or Separate Arrangements: Which Costs Less?
- The Leg Placement Mistake That Makes 10% of Guests Uncomfortable
- How to Leave Space for Platters on a Family-Style Banquet Table?
- Why Velvet Linens Are the Ultimate Texture Hack for Winter Weddings?
- Why Sailcloth Tents Glow at Night and How to Light Them Properly?
- How to Design a Tablescape That Survives a 4-Course Fine Dining Service?
Do Banquet Tables Really Save Space Compared to Rounds?
The straightforward answer is yes, banquet tables are structurally more space-efficient. The linear nature of rectangular tables allows for tighter packing and more organized walkways. While round tables create pockets of “dead space” between them, long tables can be aligned into dense, orderly rows. However, this efficiency is not absolute and comes with critical caveats. The primary benefit lies in reducing the required clearance between tables.
For instance, venue planners often follow a rule of thumb that requires a minimum of 60 inches between round tables to allow for chairs to be pulled out and for service staff to pass. Rectangular tables, when arranged in rows, can function with less space between them. Yet, professionals note that banquet tables still need about 5 feet between them for chairs and walkways, highlighting that the saved space is a matter of layout optimization, not a magic bullet. The real quantification of this efficiency becomes clear when analyzing the square footage required per guest.
A detailed comparison reveals the precise advantage of rectangular setups, especially when density is the primary goal.
| Table Type | Space Per Guest | Service Access | Maximum Density |
|---|---|---|---|
| 60″ Round (8 guests) | 13-14 sq ft | 360° access | Staggered layout 15% more efficient |
| 8′ Rectangular (8 guests) | 10-11 sq ft | Side access only | 32% denser in aligned rows |
| 72″ Round (10 guests) | 14-15 sq ft | Full perimeter | Requires 60″ minimum spacing |
As the data shows, an 8-foot rectangular table uses significantly less square footage per person than a comparable round table. This makes them the superior choice for maximizing guest count in a venue with fixed dimensions. The trade-off, however, is reduced service access, a factor that becomes increasingly important with complex meal service and is a recurring theme in banquet table engineering.
Tablecloth or Runner: Which Works Best on a Farm Table?
When styling a farm table, the choice between a bare table, a runner, or a full tablecloth is a structural decision, not just an aesthetic one. A bare farm table celebrates the raw material, but it offers no protection and can feel stark. A full tablecloth provides formality and a canvas for your color palette, but it completely hides the very feature you chose the table for: its beautiful wood grain. The most effective solution often lies in strategic layering, using a runner not just as decoration, but as a tool to define zones on the table.
A runner works best when its purpose is to create a visual “highway” down the center of the table. This defines the area for centerpieces and shared platters, leaving the individual place settings on the bare wood. For farm tables with a width greater than 36 inches, a runner helps to break up the vast wooden expanse and guide the eye. Conversely, for a more formal or transformative look, professional stylists recommend layering. Starting with a full, floor-length tablecloth as a base layer can elevate the entire design, with a contrasting runner on top adding depth and texture.
This layering technique allows you to combine the best of both worlds: the formality of a full linen with the visual interest and color accent of a runner.
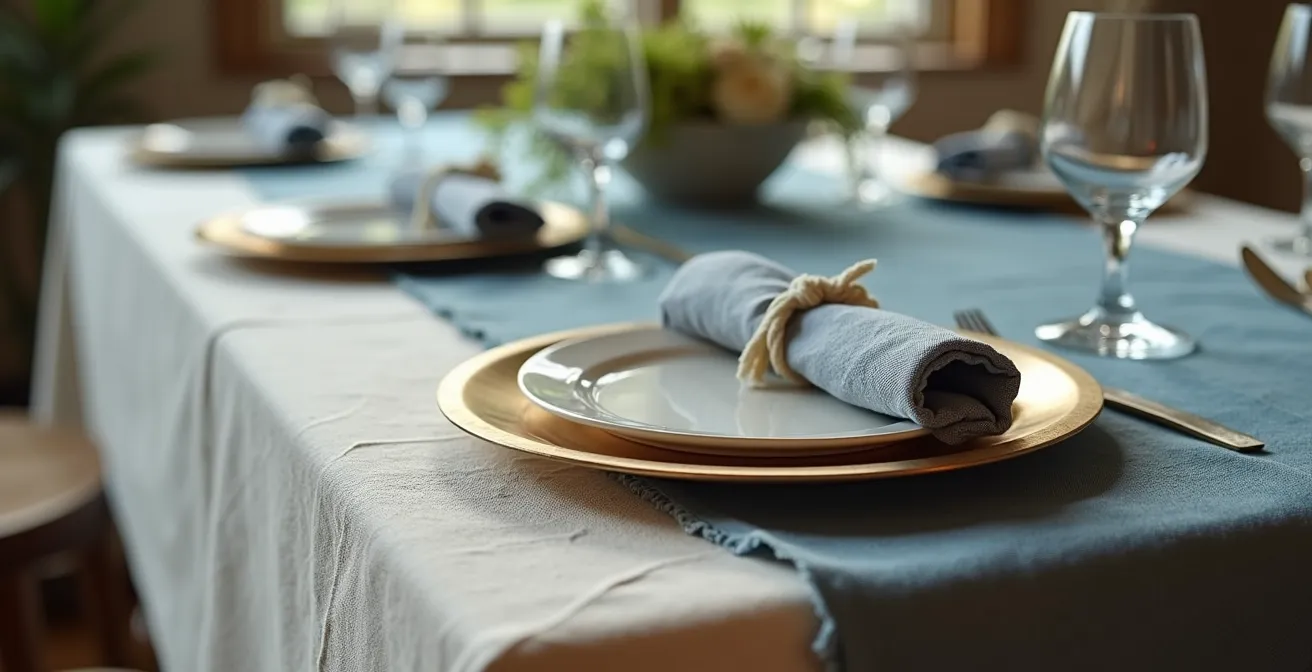
As seen in professional styling, the key is the intentional mixing of textures. A smooth, neutral base tablecloth paired with a richly textured runner—such as raw-silk, velvet, or cheesecloth—creates a tactile experience that enhances the visual design. For family-style service where spills are a concern, using a runner-only approach with oversized charger plates at each setting can provide a practical yet elegant solution, offering protection where it’s needed most without hiding the table completely.
Continuous Garland or Separate Arrangements: Which Costs Less?
A lush, continuous garland running the length of a banquet table is an iconic look, but it is one of the most misunderstood elements in terms of cost. The assumption that greenery is cheaper than flowers is a dangerous one. Garlands are incredibly labor-intensive to construct, requiring florists to hand-wire individual stems onto a rope base. This labor, combined with the sheer volume of foliage needed, makes them a premium floral product.
From a financial perspective, separate, clustered arrangements are almost always the more cost-effective option. You can achieve significant visual impact by placing three to four smaller arrangements down the center of an 8-foot table, interspersed with candles. This approach uses fewer materials and requires less construction time for the florist. Pricing data confirms this disparity; professional florists typically charge between $25-50 per foot for a simple greenery garland, with prices easily exceeding $100 per foot for garlands that include flowers. For a wedding with multiple long tables, this cost adds up exponentially.
Real-world examples from couples often show sticker shock, with one bride sharing a quote of $1500 for seeded eucalyptus on 10 tables. While DIY options exist—such as Costco’s 25-foot garland ropes for around $80—they often lack the fullness and artistry of a custom piece and still require on-site styling. In contrast, a budget allocated to separate arrangements allows a florist to concentrate value in specific zones, creating focal points with higher-quality blooms that would be too expensive to distribute throughout a full garland. Ultimately, a continuous garland is a luxury statement, while separate arrangements represent a more strategic and budget-conscious design choice.
The Leg Placement Mistake That Makes 10% of Guests Uncomfortable
The single greatest engineering flaw in banquet table layouts is ignoring the table legs. Rental companies and venues often provide a table’s “maximum capacity” (e.g., “seats 10”), but this number rarely accounts for the physical obstruction of the legs. The result is a seating chart that looks perfect on paper but is a nightmare in practice, with at least one guest at each table forced to straddle a thick table post. This is not a minor inconvenience; it’s a fundamental failure in guest comfort that undermines the entire communal experience.
Be cautious when maximizing seating. Extra guests may have to straddle table legs, which is uncomfortable.
– Howerton+Wooten Events, Wedding Reception Space Planning Guide
This mistake is most common with trestle-style tables, which have thick, solid legs at each end, and with standard folding banquet tables that have support struts positioned awkwardly. To avoid this, you must calculate the table’s true capacity. This involves moving beyond the generic “24-30 inches per guest” rule and physically mapping out where the legs are. A seat that intersects with a table leg is not a viable seat for a multi-hour dinner service.
Solving this problem requires proactive planning and treating the seating chart as a technical diagram, not just a list of names. The best approach is to identify and neutralize these “blocked” seats from the very beginning.
Action Plan: How to Avoid the Table Leg Problem
- Request Specs: Before finalizing rentals, ask the company for table specifications or photos that clearly show the exact leg placement and dimensions.
- Map the Legs: On your floor plan, mark the physical footprint of each table leg as a “no-go” zone for guest chairs. This reveals the table’s true, comfortable capacity.
- Seat Strategically: Place couples or close family members in positions where they might share the inconvenience of a leg, allowing them to coordinate their space, rather than forcing a stranger into an awkward position.
- Calculate True Capacity: Recalculate your guest count per table based on the usable space *between* the legs, not the total length of the tabletop.
- Designate “Buffer” Seats: If you must use a compromised seat, assign it as a “buffer” for a short period or for a guest you know will be moving around frequently.
How to Leave Space for Platters on a Family-Style Banquet Table?
A family-style service is the pinnacle of communal dining, but it presents a major logistical challenge: where does the food go? A tablescape overloaded with towering centerpieces, dense garlands, and wide place settings leaves no room for the serving platters. This forces servers to hold heavy dishes awkwardly while guests scramble to clear space, shattering the relaxed, convivial atmosphere. The solution is to proactively engineer a “service highway” down the center of the table.
This means prioritizing table width. Standard banquet tables are often too narrow (around 30 inches) to accommodate a full place setting and a central line of platters. Professional planners advise that if opting for a share-style menu, you must choose tables over 1 meter (39 inches) wide. Ideally, a 48-inch wide table provides the most comfortable buffer, allowing for decor, place settings, and serving dishes to coexist without conflict. This extra width is the single most important investment for a successful family-style meal.
With the right width secured, the next step is to use the “Zoning Method” to organize the tabletop into distinct functional areas.
This method treats the table as a piece of real estate to be allocated logically:
- The Outer Zones (12-15 inches on each side): This is the “guest comfort zone,” reserved exclusively for the place setting: charger, plates, glassware, and flatware.
- The Central Zone (12-18 inches in the middle): This is the “service highway.” This area must be kept clear for the placement and movement of shared platters. All decor within this zone must be low (under 6 inches) and linear, such as bud vases or low candle holders, so platters can be placed on top or alongside them.
This strategic zoning ensures that when the food arrives, it has a designated and anticipated landing spot, facilitating a smooth, gracious, and truly communal service.
Why Velvet Linens Are the Ultimate Texture Hack for Winter Weddings?
For a winter wedding, creating an atmosphere of warmth and intimacy is paramount. While color palettes of deep blues, silvers, and burgundies are common, the most effective tool for transforming a space is texture. This is where velvet linens become a powerful design hack. Unlike standard cotton or polyester, velvet has a unique physical structure that manipulates light and adds a tangible sense of luxury and warmth.
The secret to velvet’s effectiveness lies in its “pile”—the dense, short fibers that stand up from the base fabric. This pile does two things exceptionally well in a low-light, winter environment. First, it absorbs light, creating an incredible depth of color that makes hues appear richer and more saturated. A navy velvet tablecloth looks far more opulent than a navy cotton one because it doesn’t reflect as much light, drawing you into its color. Second, the texture creates a subtle, plush surface that feels inherently warm and inviting. Heavier fabrics like velvet and brocade provide a psychological sense of coziness that is perfect for a cold-weather celebration.
Velvet has a soft drape that creates gentle folds and a shimmering surface that perfectly reflects candlelight.
– CV Linens, Velvet Drape Collection Guide
This interaction with light is what makes it a “hack.” The soft sheen from the pile catches the flicker of candlelight, creating movement and dimension across the table without the harsh glare of a satin or sequin fabric. This creates a tablescape that feels alive and shimmering, adding to the magical “winter wonderland” ambiance. By simply changing the material of the linen to velvet, you are adding a layer of tactile richness and visual depth that no other fabric can replicate, instantly elevating the entire room’s atmosphere from standard to luxurious.
Why Sailcloth Tents Glow at Night and How to Light Them Properly?
Sailcloth tents possess a luminous quality at night that standard vinyl tents can never achieve. The reason is simple: the fabric is translucent. Unlike opaque vinyl, which blocks light, the sailcloth material is designed to diffuse it. When lit from within, the entire canopy acts like a giant lantern, creating a soft, warm, and inviting glow that is visible from across the property. This inherent feature is the tent’s greatest asset, but harnessing it properly requires a strategic, multi-layered lighting approach.
Simply placing a few lights inside will create hot spots and an uneven effect. A proper design treats the tent as an architectural element with three distinct lighting needs: overall ambiance, task-specific lighting for guests, and accent lighting to highlight the structure. Failing to address all three layers results in a space that is either too dark for dining or too flat and bright for dancing.
To light a sailcloth tent effectively, you must implement a three-layer strategy:
- The Ambient Layer: This creates the signature glow. Use LED floodlights or color washes aimed up at the tent’s ceiling from the perimeter. This should be the base layer of light, providing a soft, even wash across the entire canopy. Choosing warm bulbs (2700K-3000K) is crucial to complement the natural off-white of the sailcloth.
- The Task Layer: This is for guest functionality. Each banquet table needs dedicated light for dining. This can be achieved with pin-spotting, where a narrow-beam light from the ceiling is aimed at the center of each table, or by hanging chandeliers or festoon lighting directly over the tables.
- The Accent Layer: This adds depth and drama. Use smaller uplights to illuminate the tent’s central poles, turning them from simple supports into beautiful architectural columns. You can also complement this with candlelight from candelabras on the tables, which provide flickering candlelight both at a lower and higher level for added texture.
Finally, all electrical lighting should be on dimmers. This allows you to transition the atmosphere from a bright, functional dinner setting to a moody, intimate space for dancing later in the evening, making full use of the tent’s magical glowing properties.
Key Takeaways
- Banquet tables are space-efficient but require meticulous planning for guest comfort (leg room) and service.
- The “Service Highway” is key: design a central zone for platters by using wider tables (36″+) and low, linear decor.
- A successful tablescape is “phased,” designed to evolve through each course, not a static display that impedes service.
How to Design a Tablescape That Survives a 4-Course Fine Dining Service?
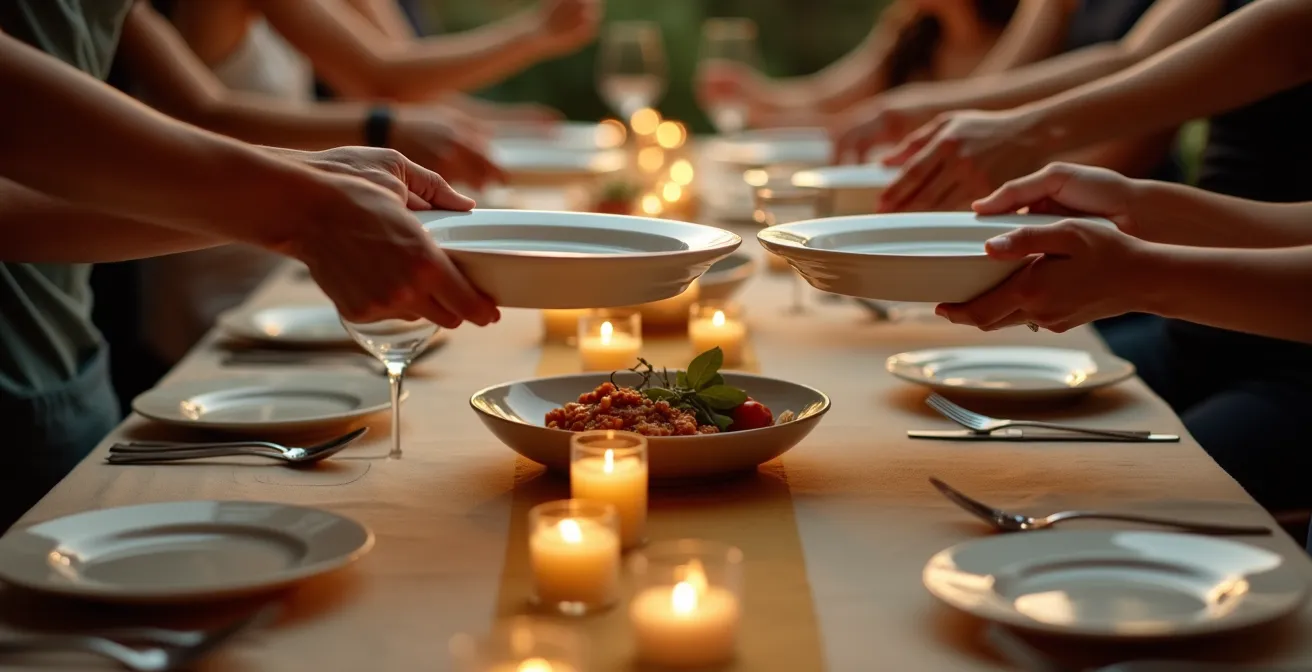
A tablescape for a multi-course meal is not a static display; it is a dynamic system that must be engineered to evolve. The biggest mistake is designing a table that looks perfect only when it’s empty. A design that survives a four-course service is one that anticipates the constant arrival and departure of plates, glassware, and cutlery. This requires a “phased” approach where the table’s layout is planned in stages, ensuring it remains functional and uncluttered from the first toast to the final coffee.
The core principle is to minimize table clutter at every stage. This starts with glassware. A common error is to pre-set every possible glass a guest might need—water, white wine, red wine, and champagne. This immediately congests the table. A much better strategy is the “Glassware Migration Masterplan,” where glasses are brought in and cleared out with their corresponding courses. The water glass is the only permanent resident; other glasses arrive with their pairings and depart once their course is finished, with a maximum of three glasses on the table at any given time.
This same logic applies to plates and cutlery. A pre-set charger plate provides an initial anchor, but it must be cleared before the main course to make room. The table below outlines a typical timeline for how items are added and cleared, ensuring the tablescape works with the service, not against it.
| Course | Pre-Set Items | Items to Add | Items to Clear |
|---|---|---|---|
| Arrival | Charger, napkin, water glass | Bread plate, butter knife | None |
| First Course | Keep charger | Wine glass, first course plate | None |
| Main Course | Basic silverware | Additional needed utensils | First course plate, charger |
| Dessert | None | Dessert fork, coffee cup | Main course items, excess glassware |
By designing the tablescape as a series of phases, you create a seamless experience for both guests and staff. The table breathes, adapting to the needs of each course. This logistical forethought is the true hallmark of a sophisticated and well-executed fine dining experience, proving that the best design is one that is both beautiful and invisible in its efficiency.
Now that you understand the principles of functional banquet design, the next step is to apply them. Start by requesting the exact table dimensions and leg placements from your rental company to build a layout that guarantees both beauty and comfort for every one of your guests.