The secret to a magical outdoor dinner isn’t just adding lights; it’s about choreographing them.
- Bistro strings define the space and provide functional light, while candles create intimacy and atmosphere.
- Success depends on layering these sources and controlling their intensity with dimmers throughout the evening.
Recommendation: Stop thinking about light as static decoration. Start designing an evolving lighting experience that transitions seamlessly from the golden hour to the end of the night.
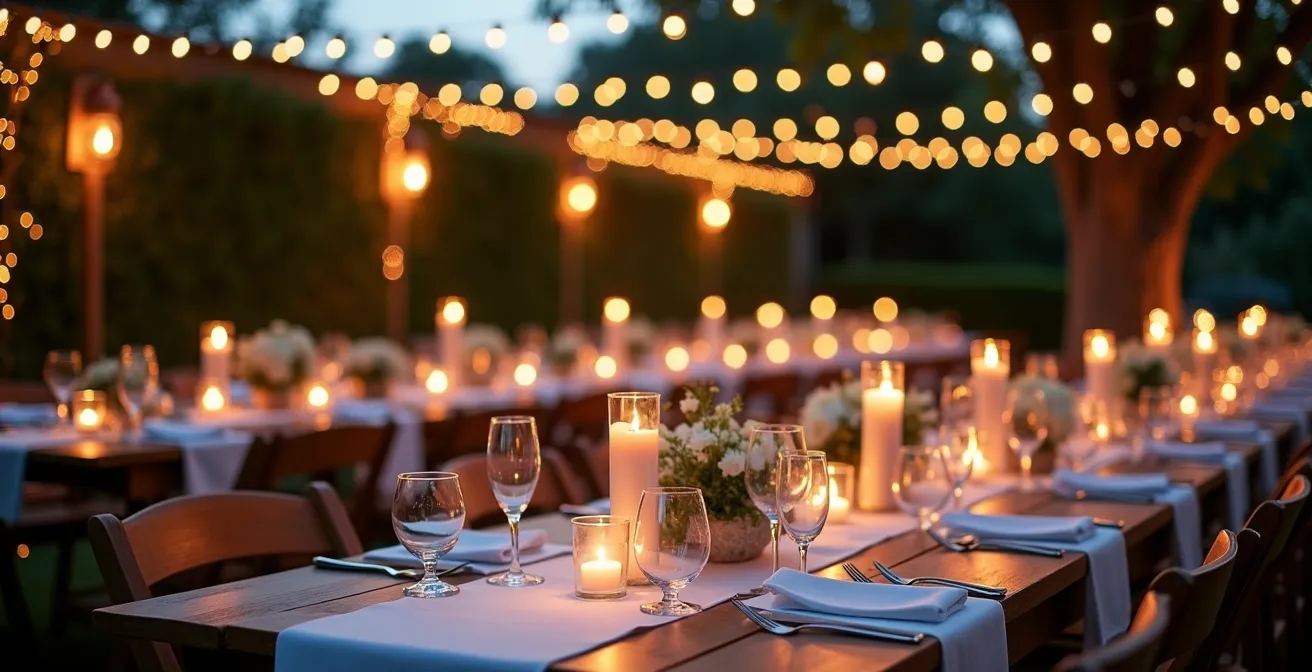
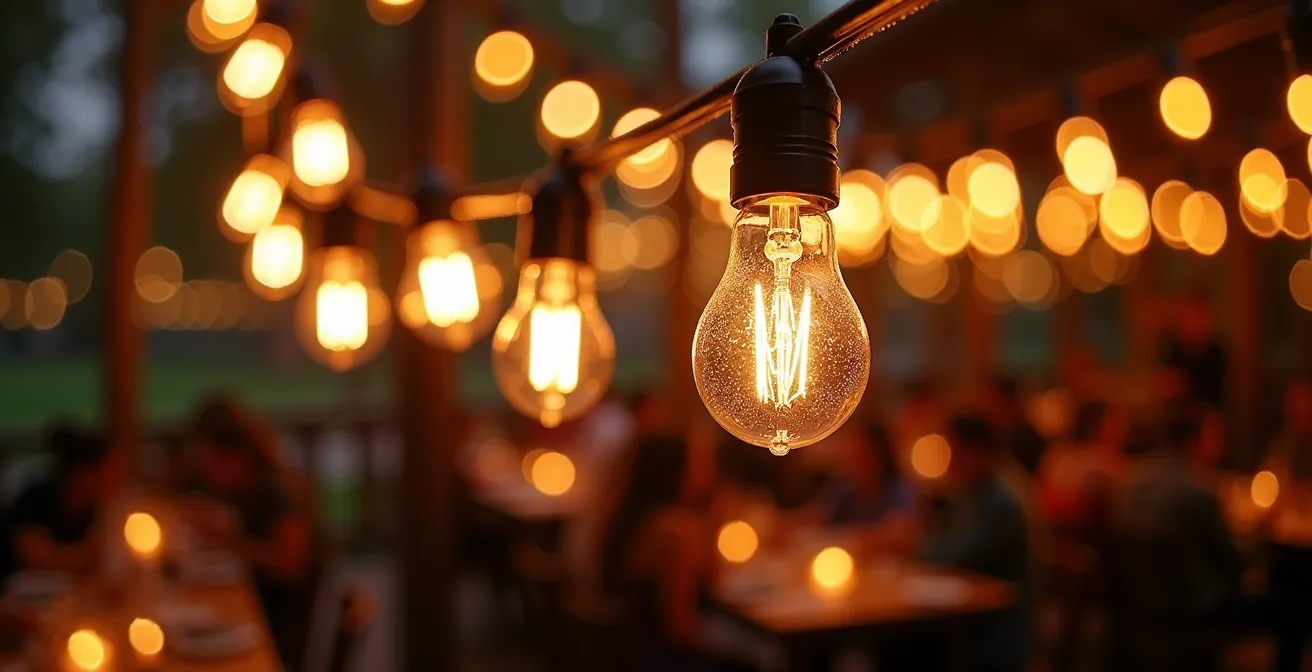
There’s a specific magic to dining under the stars, an “Italian al fresco” dream many of us chase. We string up bistro lights and dot tables with taper candles, hoping to capture that perfect blend of convivial energy and intimate romance. Yet, the reality is often a compromise: either the overhead strings are glaringly bright, washing out the delicate candlelight, or the romantic flicker of the flames leaves guests struggling to see their food. The common advice to simply “mix different types of lighting” falls short, because it ignores the fundamental tension between functional illumination and atmospheric glow.
The conventional approach treats light as a simple on/off utility. But what if the true key isn’t the lights themselves, but how they perform together throughout the evening? The solution lies not in choosing one over the other, but in mastering the art of lighting choreography. This is a designer’s approach, viewing the transition from sunset to deep night as a performance. It’s about layering light sources, controlling their intensity, and creating a dynamic environment that feels both effortlessly magical and perfectly practical. This is the essence of achieving what we call functional romance.
This guide moves beyond generic tips to provide a technical and atmospheric framework. We will deconstruct the layers of a professionally designed outdoor setting, exploring how to select string light patterns to create intimacy, how to ensure your candlelight survives the elements, and why a dimmer switch is the most critical tool in your arsenal. We will transform structural problems into design features and arm you with strategies to ensure your al fresco dinner is remembered for its flawless ambiance, no matter what the evening brings.
To navigate this journey into the art of outdoor lighting, we will explore the critical technical and aesthetic decisions that separate a mediocre setup from a truly breathtaking one. The following sections break down each component, from the grand architecture of overhead lights to the subtle, yet crucial, details of flame and flicker.
Summary: A Designer’s Guide to Balancing Outdoor String Lights and Candles
- Zig-Zag, Parallel, or X-Pattern: Which Layout Lowers the “Ceiling” Best?
- Hurricane Glass or Taper Sleeves: Which Keeps Candles Lit in a Breeze?
- Why You Must Ensure Your Bistro Lights Have a Dimmer Switch?
- How to Hide Ugly Support Poles in an Open-Air Dinner Setup?
- The “Drip-Less” Candle Myth and How to Protect Your Linens
- Real Wax Candles or LED Fakes: Which Creates the Better Ambiance?
- How to Schedule Your Ceremony for the “Golden Hour” Photography Window?
- How to Plan an Al Fresco Dinner That Survives Wind and Temperature Drops?
Zig-Zag, Parallel, or X-Pattern: Which Layout Lowers the “Ceiling” Best?
The first layer of your lighting design is architectural. Bistro strings do more than just illuminate; they define the volume of your outdoor “room.” In an open-air setting, the dark sky can feel vast and impersonal. The right string light pattern creates an atmospheric ceiling, making a large space feel intimate and contained. The pattern you choose directly impacts this perception. A simple Zig-Zag or X-Pattern can delineate a space, but more complex layouts offer greater control over the ambiance.
The goal is to create a sense of enclosure without feeling claustrophobic. The density of the lights is key. Parallel lines are excellent for long, rectangular spaces or inside tents without center poles, guiding the eye and creating a clean, structured feel. For a truly immersive effect, a full canopy, where lights radiate from a central point or crisscross extensively, is unmatched. An in-depth guide to tent lighting shows that while a “Deluxe” canopy pattern requires more strands, it consistently generates the highest guest satisfaction by creating a “starry night” effect that feels both grand and personal.
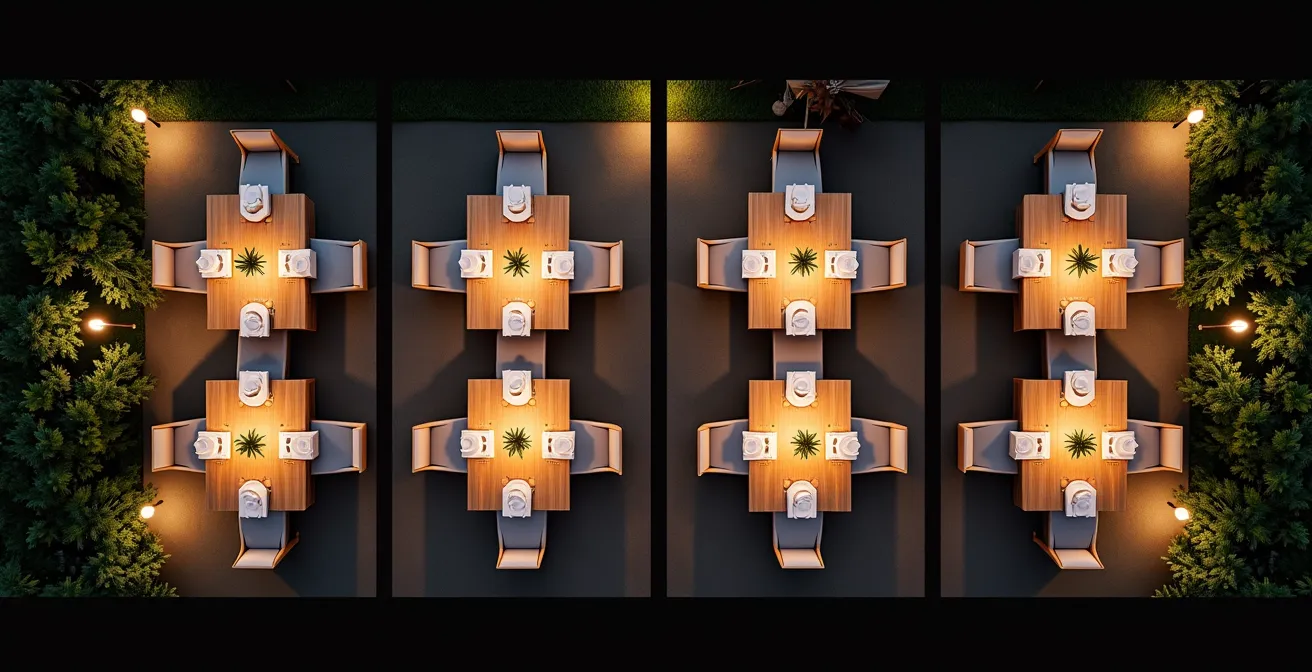
As this overhead comparison demonstrates, each pattern distributes light differently, creating unique pools of light and shadow. The denser the pattern, the lower the perceived ceiling and the more intimate the atmosphere. Consider the mood you want to evoke: a sparse parallel pattern feels modern and minimalist, while a dense, overlapping canopy is romantic and celebratory. The layout isn’t just a practical decision about coverage; it is the foundational brushstroke of your entire lighting composition.
Hurricane Glass or Taper Sleeves: Which Keeps Candles Lit in a Breeze?
Candlelight is the heart of al fresco romance, providing the warm, kinetic glow that bistro strings cannot replicate. However, its greatest strength—the living flame—is also its greatest vulnerability. A single gust of wind can extinguish the magic, and with it, the intimate atmosphere you’ve worked to create. Protecting the flame is not an optional extra; it is a technical necessity for any successful outdoor event. The choice of protection method involves a trade-off between wind resistance, aesthetic style, and the quality of the light itself.
The industry has developed a hierarchy of solutions. Simple taper sleeves offer minimal protection but maintain a rustic look. Open-top glass cylinders provide a modern aesthetic and moderate wind resistance. For true reliability, tall, enclosed hurricane glass is the gold standard, offering excellent protection while diffusing the light into a soft, steady glow. For high-wind locations like beachfronts or hillsides, event planners often employ a “double protection” technique: placing a taper candle inside a snug glass sleeve, and then placing that entire unit inside a larger, weighted hurricane vase. This method has become an industry benchmark for ensuring flame stability in challenging conditions.
The following table breaks down the performance of common candle protection solutions, allowing you to make an informed choice based on your venue’s specific challenges and your desired aesthetic.
| Protection Type | Wind Resistance | Aesthetic Style | Safety Rating | Light Quality |
|---|---|---|---|---|
| Hurricane Glass | High (15-20 mph) | Formal/Traditional | Excellent | Soft diffused glow |
| Open-Top Cylinders | Medium (10-15 mph) | Modern/Minimalist | Good | Direct flame visibility |
| Taper Sleeves | Low-Medium (5-10 mph) | Rustic/Casual | Moderate | Natural flickering |
| Double Protection (Sleeve+Hurricane) | Very High (20+ mph) | Versatile | Excellent | Controlled steady flame |
Why You Must Ensure Your Bistro Lights Have a Dimmer Switch?
If bistro strings form the architecture and candles provide the heart, the dimmer switch is the brain of your lighting operation. It is the single most critical tool for executing a successful lighting choreography. An outdoor evening is not a static event; the ambient light shifts dramatically from the warm glow of sunset to the deep black of night. Without a dimmer, your bistro lights are stuck on one setting—often too dim at the start and far too harsh once darkness falls. A dimmer transforms your lighting from a static installation into a dynamic, responsive system.
The ability to adjust brightness allows you to layer light sources effectively. During cocktail hour, you might have the strings at 70% brightness for energy and visibility. As dinner is served and candles are lit, you can dim the overhead lights to 50% or lower, allowing the candlelight to become the primary source of table-level intimacy. This creates the desired functional romance: enough overhead light to navigate, but low enough to let the warm, personal glow of the candles dominate the immediate space. Furthermore, compatibility is crucial; industry analysis reveals that 85% of LED string light failures at events are caused by incompatible dimmer switches. Always use a heavy-duty, outdoor-rated dimmer specifically designed for dimmable LED or incandescent bulbs.
The dimmer is the tool to find the perfect balance between romantic low light and the technical needs of the cameras. Coordination with your photo/video team is essential.
– Professional Wedding Lighting Specialists, The Lighting & Sound Company Wedding Guide
This coordination is a key part of the choreography. Photographers and videographers may need the lights raised for key moments like speeches, then lowered for the first dance. A dimmer gives you the control to manage these transitions seamlessly, making the lighting an active participant in the evening’s narrative.
How to Hide Ugly Support Poles in an Open-Air Dinner Setup?
In the ideal al fresco world, mature trees provide perfect, natural anchor points for bistro lights. In reality, we often rely on functional—but unsightly—support poles, stakes, or structural pillars. These utilitarian elements can easily break the magical illusion. A designer’s eye, however, sees these not as problems, but as opportunities. Instead of trying to hide a support pole, the most elegant solution is often to integrate it into the design itself.
Rather than a stark metal pole, imagine an “enchanted tree” of light. This effect is achieved by wrapping a structural pole from base to top with delicate, warm-white fairy lights. Adding a floral arrangement or greenery at the base completes the transformation, turning an eyesore into a stunning vertical feature. This technique not only conceals the pole but also adds another layer of soft, ambient light to the space. For a more modern or industrial-chic aesthetic, you can even embrace the structure, using professional aluminum box trusses as intentional architectural elements that both support the lights and frame the dining area.

If your space has no existing structures, you must create your own anchor points. Forget flimsy shepherd’s hooks that lean and fail. Professional solutions prioritize both stability and aesthetics. Some of the most effective methods include:
- Wine Barrels: Filled with concrete or sand, they offer immense stability and a rustic-chic look.
- Large Planters: Heavy, wide-diameter (24-inch+) planters can be filled with a weighted base and topped with decorative plants, serving a dual purpose.
- Box Truss Rentals: For maximum safety and a clean, modern look, renting a professional truss system creates a self-supporting frame for your entire lighting design.
The “Drip-Less” Candle Myth and How to Protect Your Linens
The term “dripless” candle is one of the most misleading in the event industry. While many high-quality candles are formulated to minimize drips in perfect, draft-free indoor conditions, this promise quickly evaporates outdoors. The slightest breeze, a slight angle in the candle holder, or ambient temperature fluctuations can cause even the most expensive candle to drip. Believing the myth is a surefire way to end up with wax-stained linens and a costly cleaning bill. A comprehensive wedding lighting guide documents that even ‘dripless’ candles have a 73% chance of dripping in the variable conditions of an outdoor setting.
Therefore, a professional lighting designer never relies on the candle’s promise; they implement a hierarchy of wax protection. This is a multi-layered defense strategy designed to catch any potential drips before they become a problem. The approach moves from the most direct protection to broader safeguards and finally, to emergency preparedness.
A proactive defense system is your only guarantee against wax damage. Follow this professional hierarchy for complete peace of mind:
- Primary Defense (The Catch): The first and most crucial layer is a physical barrier. Install glass or metal bobeches (drip-catching disks) directly onto every single taper and pillar candle holder. This is your non-negotiable first line of defense.
- Secondary Layer (The Mat): Underneath centerpiece arrangements that include candles, place a protective, decorative surface. This can be a beveled mirror, a polished stone slab, or a metal tray that complements your decor while providing a waterproof barrier.
- Invisible Protection (The Shield): As a precautionary measure, treat your high-value linens with a fabric protector spray at least 24 hours before the event. This won’t stop wax from landing, but it will make removal significantly easier.
- Emergency Response (The Kit): Be prepared for the worst. Have an emergency wax removal kit on hand, including a hair dryer (to melt the wax), paper towels or a brown paper bag (to absorb it), and ice cubes (to harden and chip off any residue).
Real Wax Candles or LED Fakes: Which Creates the Better Ambiance?
The debate between real flame and LED candles touches the very soul of ambiance. A real wax candle offers an unparalleled multi-sensory experience: the natural, chaotic flicker of the flame, the subtle warmth it radiates, and even the faint scent of wax. This is 100% visual and atmospheric authenticity. However, this authenticity comes with significant drawbacks outdoors: they are susceptible to wind, pose a fire risk, and require constant monitoring. High-quality LED candles, on the other hand, offer a compelling alternative that prioritizes safety and reliability.
The decision is no longer a simple choice between a real flame and a dull, orange plastic bulb. Modern premium LEDs have closed the gap considerably. Look for models with “moving flame” technology and, most importantly, a warm color temperature between 1800K and 2200K, which closely mimics the hue of a real flame. Many now come with real wax exteriors, making them visually indistinguishable from a distance. The most successful and sophisticated event designs often use a hybrid strategy: real, protected wax candles are placed on guest tables for up-close authenticity, while high-quality LEDs are used in hard-to-reach areas, windy spots, or near flammable decorations.
To make a decision, you must weigh authenticity against practicality. This table provides a clear comparison of the key performance metrics.
| Feature | Real Wax Candles | Premium LED Candles |
|---|---|---|
| Visual Authenticity | 100% natural flicker | 85-90% with moving flame tech |
| Multi-Sensory Experience | Warmth + subtle scent | Visual only |
| Wind Resistance | Poor – extinguish easily | Excellent – unaffected |
| Safety Rating | Requires monitoring | Fire-safe, child-safe |
| Cost (100 candles) | $200-300 purchase | $400-600 rental |
| Setup Time | 45-60 minutes | 15-20 minutes |
How to Schedule Your Ceremony for the “Golden Hour” Photography Window?
The most masterful lighting design begins by honoring the best natural light available. The “Golden Hour”—the period shortly after sunrise or before sunset—is a gift to photographers and event designers. During this window, the sun is low in the sky, casting a soft, warm, diffused light that is incredibly flattering for portraits and creates a magical, ethereal atmosphere. Planning to align key moments with this natural phenomenon is the first step in any sophisticated lighting choreography. It’s about starting the evening with the best possible natural canvas before your own lighting design takes over.
Timing is everything. The Golden Hour is a fleeting moment, and you must schedule with precision to capitalize on it. You can’t guess; you must use tools. The most important part of the plan is what happens when it ends. As professional photographers note in the definitive guide on wedding lighting, you should frame the end of the Golden Hour as the cue to begin the artificial lighting sequence. This creates a seamless and magical transition from natural to designed light. As the warm sunlight fades, the first glow of your bistro strings and candles should emerge, ensuring there is no awkward, dark interval.
Your Action Plan: Golden Hour Timing
- Calculate Precisely: Use a dedicated app like PhotoPills or Sun Seeker to determine the exact start and end times of the Golden Hour for your specific wedding date and geographic location.
- Schedule Backwards: Plan your ceremony to start approximately 90 minutes before the calculated sunset time. This ensures your vows, recessional, and initial portraits are bathed in the most beautiful light.
- Plan the Transition: Coordinate with your lighting technician or planner to begin activating the bistro strings (on a low dimmer setting) and lighting candles as the Golden Hour officially ends.
- Prepare a Contingency: Cloudy days can eliminate the Golden Hour. Have a backup plan with your photographer, who can use flashes with warm-toned gels to replicate the effect.
- Distinguish the Hours: Know the difference. The Golden Hour is for warm, romantic portraits. The “Blue Hour” —the 20-30 minutes *after* sunset—offers a cool, deep blue sky, perfect for dramatic, atmospheric shots with your lighting design in the foreground.
Key Takeaways
- True outdoor ambiance is achieved through “lighting choreography,” not just placing lights.
- Layering is essential: Use dimmable bistro strings for structure and protected candles for intimacy.
- The environment is a factor: Plan for wind, temperature drops, and leverage natural light like the Golden Hour.
How to Plan an Al Fresco Dinner That Survives Wind and Temperature Drops?
A perfect lighting design can be completely undermined if your guests are uncomfortable. An al fresco dinner is a battle against the elements, and a successful event plan must anticipate and mitigate the two biggest comfort killers: wind and cold. Your lighting and heating strategies should be developed in tandem, as they can work together to create a cozy, protected environment. Thinking about guest comfort is the final layer of your atmospheric design.
When temperatures drop, heating becomes essential. Propane mushroom heaters are effective for covering large areas, but their industrial look can clash with an elegant aesthetic, and they require significant clearance for safety. Fire pits offer a wonderful, romantic ambiance but provide more localized heat and require smoke management. For a discreet solution, electric radiant heaters can be mounted on structures and provide silent, directed warmth. The key is to position your heating elements strategically between tables or in lounge areas to create pockets of warmth without intruding on the main design.
Wind is a more subtle but equally disruptive force. Beyond just extinguishing candles, a persistent breeze can make guests feel chilled even on a mild night. Here, lighting can play a surprising dual role. A creative and highly effective solution is to create vertical “light curtains” by hanging multiple strings of lights downwards along the perimeter of the dining area. This not only creates a breathtakingly beautiful backdrop but also acts as a porous windbreak, diffusing and slowing strong breezes before they reach the tables. This synergy of form and function—where a design element also solves a practical problem—is the hallmark of a truly masterful plan.
Your goal is to become the choreographer of your event’s atmosphere. By moving beyond simple decoration and embracing a layered, dynamic approach to lighting, you can craft an al fresco experience that is not only beautiful but also deeply comfortable and truly unforgettable. Begin planning your lighting choreography today to ensure your evening unfolds with flawless, functional romance.