In summary:
- Prioritize warm, high-CRI lighting (2700K-3000K) to ensure flattering skin tones in photos and hide imperfections.
- Use precise accent lighting, like pin-spotting, to draw attention to key elements like centerpieces and cake.
- Employ strategic uplighting to “paint” over unattractive walls or create architectural interest with texture and shadow.
- Create depth by layering light: use ambient, task, and accent lighting together for a dynamic, professional result.
- Control the energy of the event by creating a lighting timeline, dimming the lights to transition from an intimate dinner to a high-energy dance party.
You’ve found the perfect partner, but your venue… it has character. Perhaps it’s a historic hall with dark wood paneling, a hotel ballroom with dated carpets, or a space cursed with harsh, unflattering fluorescent overheads. The immediate fear is that these flaws will dominate your wedding photos and kill the romantic atmosphere you’ve dreamed of. The common advice is to simply add more light—string up some bistro lights, scatter a few uplights, and hope for the best. But this often makes things worse, creating a flat, overlit environment that exposes every imperfection.
The truth is, effective wedding lighting isn’t about adding more light; it’s a technical discipline of shaping, subtraction, and color science. It’s about using light as a tool to sculpt your space, not just illuminate it. The real secret to transforming a challenging venue doesn’t lie in the quantity of fixtures, but in understanding the technical properties of light itself: its color temperature, its direction, and its interaction with surfaces. Forget the generic advice. What you need is a technician’s framework for manipulating light to mask imperfections, highlight beauty, and guarantee your photographer can capture flawless, atmospheric images.
This guide will walk you through that framework. We will explore the science of color temperature and why it’s critical for photography. We’ll cover precision techniques like pin-spotting, strategies for layering different light sources, and a timeline for transitioning the mood throughout your event. Finally, you’ll get a playbook for using uplighting to not just light your walls, but to completely transform them.
Summary: A Technical Approach to Flawless Wedding Lighting
- Why Warm Amber Lighting Is Flattering While Cool White Ruins Photos?
- How to Pin-Spot Floral Centerpieces so They Pop in Dimmed Rooms?
- Real Wax Candles or LED Fakes: Which Creates the Better Ambiance?
- The “Supermarket Effect”: How to Avoid Over-Lighting Your Dance Floor
- When to Dim the Lights: The Timeline for Transitioning from Dinner to Dancing
- Cut Crystal vs. Smooth Glass: Which Reflects Candlelight Better?
- How to Balance Bistro Strings and Taper Candles for Outdoor Dining?
- How to Transform Your Venue Walls With Strategic LED Uplighting?
Why Warm Amber Lighting Is Flattering While Cool White Ruins Photos?
The single most critical lighting decision for your wedding is color temperature, measured in Kelvin (K). It’s the difference between guests looking warm and radiant versus sallow and stark under a bluish glare. Standard overhead lighting is often in the 4000K-5000K “cool white” range, which is functional for an office but disastrous for photography. It emphasizes skin imperfections, creates harsh shadows, and casts a clinical, sterile vibe over the entire room.
For a romantic and photogenic atmosphere, you must use light in the 2700K to 3000K range. This is the “warm white” or amber glow that mimics candlelight and the golden hour sun. This warmth is universally flattering to all skin tones, creating a soft, inviting ambiance that hides minor flaws in the venue’s decor. Furthermore, for color accuracy in photos, you must consider the Color Rendering Index (CRI). CRI measures a light’s ability to faithfully reproduce colors compared to a natural light source. For professional results, you need a light source with a CRI of 90 or higher. Most standard venue lights have a low CRI, which is why photographers often have to battle strange color casts. As wedding videographer Myong of Camera to Freedom demonstrates, using a professional LED light at a warmer 3200K is ideal for creating an inviting indoor atmosphere, while cooler temperatures are best reserved for balancing outdoor daylight.
By taking control and specifying warm, high-CRI lighting, you are essentially providing your photographer with the best possible canvas. You are ensuring that the skin tones in your photos are creamy and natural, the colors of your flowers are rich and true, and the overall mood is one of romance, not a board meeting.
How to Pin-Spot Floral Centerpieces so They Pop in Dimmed Rooms?
In a dimly lit reception, your expensive and beautiful floral centerpieces can easily fade into the background, becoming lost in the shadows. The solution is not to raise the overall room light, which would destroy the intimate mood. Instead, you use a surgical lighting technique called pin-spotting. A pin spot is a tightly focused beam of light, almost like a theatrical spotlight, aimed directly at an object you want to highlight—your centerpieces, the wedding cake, or a sweetheart table.
This creates a dramatic, high-contrast effect. The object is brilliantly illuminated while the surrounding area remains dark, forcing the eye to focus on what matters. It makes the colors of the flowers appear more vibrant and adds a sense of depth and luxury to the room’s design. The key to effective pin-spotting is precision. The beam must be just wide enough to cover the target without excessive “light spill” onto the tablecloth or guests. According to The Lighting & Sound Company, while pin spots are known for their narrow 1-degree angle, they can diffuse up to 40 degrees for wider applications. Modern wireless pin spots offer an adjustable beam angle, typically from 5 to 25 degrees, allowing a technician to perfectly frame each centerpiece.
To properly execute this, lights are mounted on overhead trusses or discreet stands and carefully aimed before guests arrive. This is accent lighting in its purest form—it doesn’t just illuminate, it directs attention and creates visual hierarchy.
As you can see, the result is a centerpiece that doesn’t just sit on the table, but truly “pops” with dimension and color. It transforms a simple floral arrangement into a piece of art, ensuring your investment in decor is seen and appreciated all night long.
Real Wax Candles or LED Fakes: Which Creates the Better Ambiance?
The debate between real wax candles and their LED counterparts is a classic one in wedding design. Nothing quite matches the organic, romantic flicker of a real flame. However, they come with significant logistical and safety challenges. Many venues, especially historic ones, have outright bans on open flames. They are also susceptible to wind in outdoor or drafty settings and provide very little actual illumination for photography.
High-quality LED candles have become the industry standard for a reason. They eliminate the fire risk, are unaffected by wind, and provide consistent, controllable light. While basic models can have a repetitive, unnatural flicker, premium “real-flicker” or wax-dipped versions are remarkably convincing. They offer the ambiance of candlelight without the associated liabilities. A professional lighting technician can even integrate them into a central control system, allowing for dimming or color changes throughout the night.
This table breaks down the key differences to help you make an informed decision based on your venue’s rules and your aesthetic priorities.
| Feature | Real Wax Candles | LED Candles |
|---|---|---|
| Light Quality | Natural, random flicker | Predictable pattern (basic) or real-flicker (premium) |
| Venue Restrictions | Often banned in historic venues | Universally accepted |
| Wind Resistance | Poor – requires hurricane shields | Excellent – unaffected by wind |
| Photography Impact | Beautiful but low light output | Consistent illumination |
| Safety | Fire risk | Completely safe |
Expert Recommendation: The Best of Both Worlds
Luxury wedding planner HauteFetes acknowledges that real candles provide an unmatched romantic ambiance. However, for safety and venue compliance, they recommend high-end ‘wax-dipped’ LED candles as the optimal compromise. These premium fakes use real wax on the exterior and sophisticated flicker technology, making them nearly indistinguishable from the real thing, especially in a dimly lit room. This allows couples to achieve the desired aesthetic without the risk or restrictions.
Ultimately, the choice depends on your priorities. If your venue allows it and you accept the low light output, nothing beats a real flame. For most couples, however, investing in high-quality, wax-dipped LED candles offers the most practical and visually effective solution.
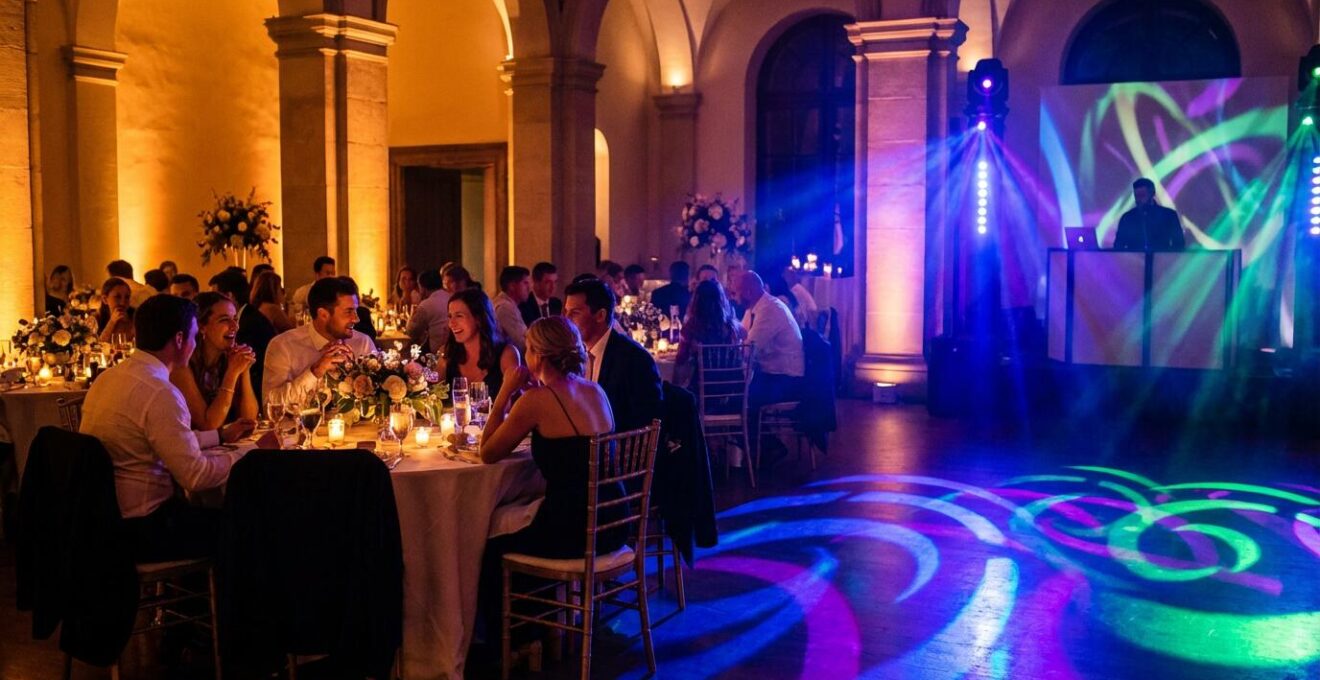
The “Supermarket Effect”: How to Avoid Over-Lighting Your Dance Floor
After an intimate dinner, it’s time to party. But flipping on a set of bright, static lights creates what lighting designers call the “Supermarket Effect”—a flat, overly bright environment that makes guests feel exposed and self-conscious. A great dance floor is defined as much by shadow as it is by light. It needs contrast, movement, and energy to draw people in and make them lose their inhibitions.
To avoid the supermarket aisle vibe, you need to think dynamically. Instead of a uniform wash of light, use a combination of techniques to create texture and motion. Gobo projectors can cast patterns—like floral motifs, abstract shapes, or a custom monogram—across the floor, breaking up the surface and adding visual interest. Intelligent moving lights, or “moving heads,” are essential for a high-energy party. These can be programmed to sync with the music, sweeping beams of color across the room and changing patterns in time with the beat. This creates a concert-like atmosphere that feels immersive and exciting.
The key is contrast. Position lights at angles from the sides or the floor, not just from directly overhead. This creates depth and shadow, which is far more flattering and interesting than a flat floodlight. As the experts at Second Song Entertainment put it, the goal is to create a moment, not just provide visibility:
Intelligent moving lights, LED washes, and effects positioned around your dance floor… moving heads synced with the beat drop during ‘Mr. Brightside.’ 200 guests simultaneously lost their minds.
– Second Song Entertainment, Wedding Lighting Setup Guide 2025
A well-lit dance floor is an invitation. By using patterns, movement, and contrast, you transform it from a simple patch of flooring into the vibrant heart of your celebration.
When to Dim the Lights: The Timeline for Transitioning from Dinner to Dancing
Your wedding is not a single event; it’s a series of moments, each with its own distinct mood. Your lighting should reflect this progression. A successful lighting design is a “lighting script” that evolves throughout the evening, guiding the emotional energy of your guests. A static, one-size-fits-all approach will leave your dinner feeling like a cocktail party and your dance floor feeling like a cafeteria. The most critical transition is from dinner to dancing, which requires a slow, deliberate cross-fade, not an abrupt switch.
Here is a typical professional lighting timeline:
- Guest Arrival: Bright, welcoming light at full intensity to help guests find their seats and acclimate.
- Ceremony: Focused lighting on the couple, with subtle, soft fill light for the guests and architecture.
- Cocktail Hour: Social and vibrant lighting, dimmed to about 70% intensity to encourage mingling.
- Dinner: Intimate and warm, dimmed to around 50% intensity. This is when pin-spotted centerpieces truly shine against the darker ambient background.
- Speeches: A focused spotlight on the speaker ensures they are the center of attention, while the rest of the room is dimmed further.
- Transition to Dancing: This is a crucial 5-10 minute period. As dinner winds down, the lights slowly cross-fade from the warm, static dinner look to a more dynamic, colorful dance floor setup. This signals a change in energy without being jarring.
- Dancing: Dynamic, colorful, and music-synced lighting takes over to drive the party.
Executing such a timeline requires professional equipment and a dedicated technician. According to wedding industry data, couples should anticipate that a professional lighting package starts around $1,500 and can go up significantly depending on complexity. It’s an investment in controlling the entire atmosphere of your event from start to finish.
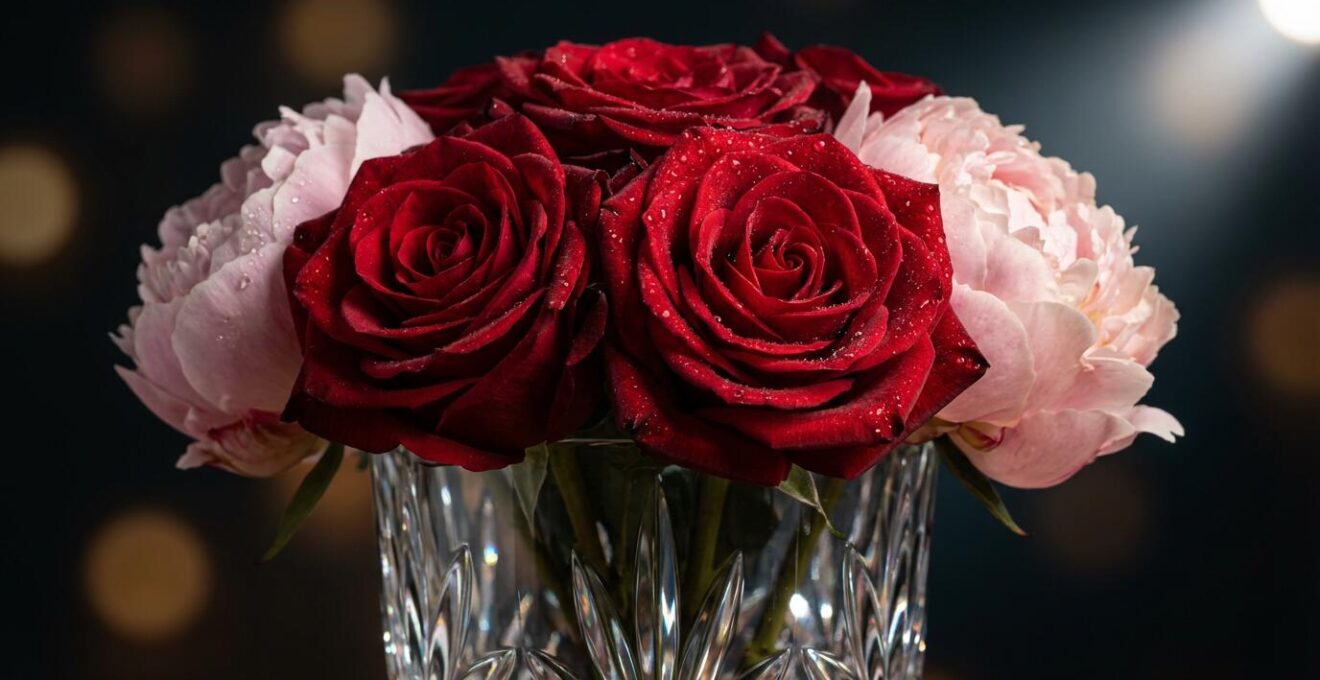
Cut Crystal vs. Smooth Glass: Which Reflects Candlelight Better?
The glassware and vases you choose are not just containers; they are optical instruments that shape and multiply the light from your candles. The choice between faceted cut crystal and simple smooth glass has a profound impact on the room’s ambiance and how it appears in photographs. This decision should be driven by the overall theme and desired energy of your event.
Cut crystal is designed for maximum sparkle. Its multiple facets act like tiny prisms, catching the light and breaking it into countless points of brilliant, sharp reflection. This is known as specular reflection. The effect is one of high energy, glamour, and opulence. For a “Great Gatsby,” ballroom, or otherwise glamorous theme, cut crystal is the perfect choice. In photos, it creates beautiful bokeh effects, turning distant candlelight into soft, shimmering orbs.
Smooth glass, on the other hand, creates a soft, diffused glow. Instead of sharp points of light, it produces a gentle, even radiance. This is ideal for minimalist, modern, rustic, or romantic themes where the desired mood is understated and serene. It contributes to the overall ambient light level without creating distracting sparkles. The choice also extends to specialty glass, such as mercury glass, which provides a warm, metallic, and vintage glow.
Thematic Reflection Analysis
Professional wedding planners consistently report that cut crystal’s ability to create thousands of sparkling points through specular reflection makes it the go-to for glamorous, high-energy themes. In contrast, they select smooth glass for its soft, diffused glow when designing for minimalist or rustic romantic themes, where the goal is a more serene and understated ambiance. The material is chosen to amplify the theme’s core energy.
This table summarizes how different glass types interact with light, helping you match your decor to your theme.
| Property | Cut Crystal | Smooth Glass | Mercury Glass |
|---|---|---|---|
| Reflection Type | Specular (sharp, bright points) | Diffuse (soft glow) | Mixed (metallic warmth) |
| Best Theme Match | Glamorous, ballroom | Minimalist, modern | Vintage, antique |
| Light Energy | High, sparkling | Low, understated | Medium, warm |
| Photography Impact | Creates bokeh effects | Subtle highlighting | Unique vintage glow |
How to Balance Bistro Strings and Taper Candles for Outdoor Dining?
Lighting an outdoor dinner presents a unique challenge: you need enough light for guests to see, but not so much that you lose the magic of being under the stars. The key to success is a concept professionals call light layering. Instead of relying on one source, you combine different types of light, each serving a specific purpose. For outdoor dining, the two primary layers are the ambient layer and the task layer.
As the experts at Bali Vintage Florist explain, your approach should be strategic:
Bistro strings should be used for the ‘ambient layer’ (general illumination and defining the space’s perimeter), while candles provide the ‘task layer’ (intimate light on the tables for guests to see each other and their food).
– Bali Vintage Florist, 7 Brilliant Wedding Lighting Tips
The ambient layer, created by bistro or string lights, should be hung high (at least 10 feet above tables) and set to a low intensity using a dimmer. This provides a soft, general glow over the entire area without being harsh or overpowering. A zigzag pattern is often better than a dense canopy, as it creates pockets of shadow that add depth and romance. The goal is to define the space and provide safe navigation, not to flood it with light.
The task layer is the intimate light on the tables themselves, provided by taper candles or LED equivalents. This is the light that illuminates faces and food, fostering conversation. To be effective outdoors, real candles must be protected from the wind by tall glass hurricane shields. This layering approach ensures the overall space feels magical and expansive, while the experience at each table remains warm and personal.
Key Takeaways
- The foundation of good lighting is color science: always use warm (2700K-3000K), high-CRI (90+) light sources for flattering, photo-ready results.
- Create visual hierarchy and drama by using accent lighting (like pin-spotting) to highlight key decor, and use shadows to your advantage.
- Master your venue’s atmosphere by creating a lighting timeline that transitions the mood from intimate dinner to high-energy party.
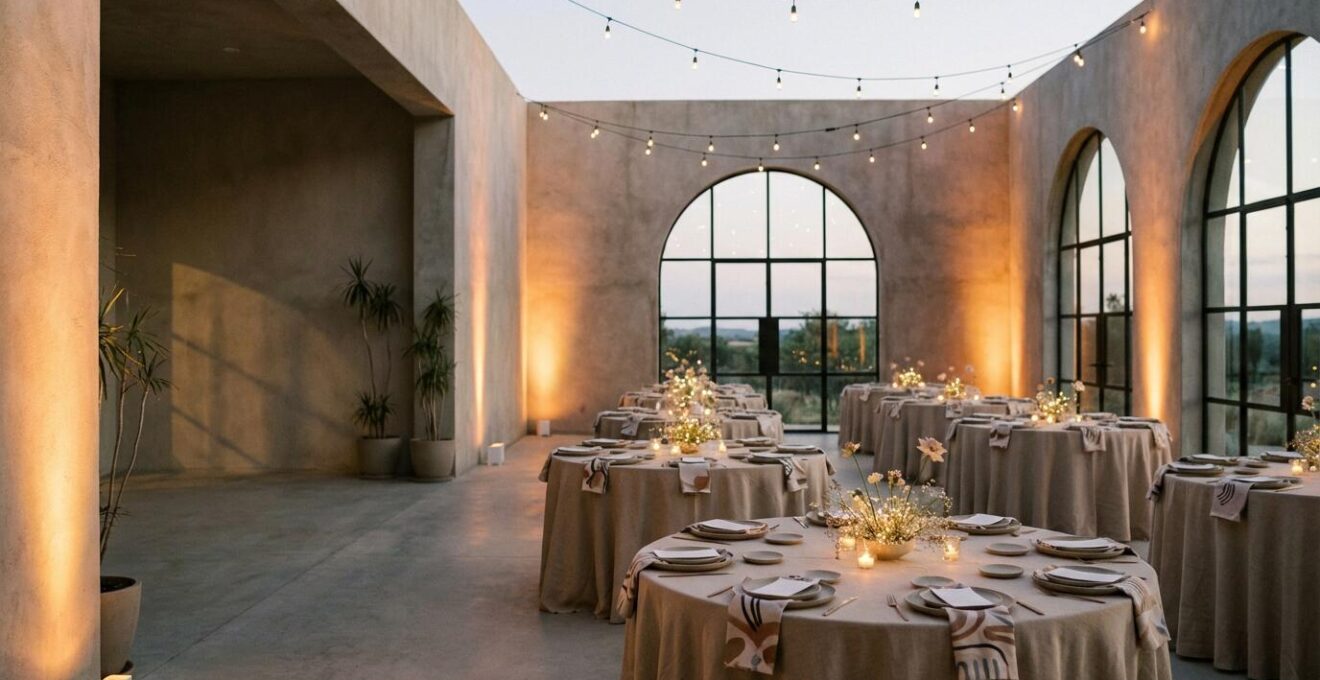
How to Transform Your Venue Walls With Strategic LED Uplighting?
Uplighting is perhaps the most powerful tool for hiding venue flaws and completely transforming a space. An uplight is a fixture placed on the floor that projects a beam of light up a wall or architectural feature. When used strategically, it can “paint over” undesirable features, create the illusion of height, and add dramatic texture to boring surfaces. It’s not just about adding color; it’s about selective illumination and architectural enhancement.
The transformative power of this technique is immense. A well-executed uplighting plan can make an ordinary room feel extraordinary.
The Millwick Uplighting Transformation
At Millwick, a popular venue in Downtown LA, a wedding planner was faced with industrial brick walls that didn’t fit the couple’s desired romantic theme. By placing 24 amber uplights around the room’s perimeter, the lighting team transformed the rough, industrial brick into what appeared to be the warm, sun-drenched walls of a Tuscan villa. The effect was so convincing that the photographer asked if the walls had been physically painted for the event, demonstrating the dramatic impact of strategic color washing.
Instead of thinking about what to light, think about what to hide. If a wall has a dated pattern, washing it in a saturated color like deep amber or blue will completely obscure it. If a room feels cavernous and uninviting, light only the beautiful architectural columns and leave the flat, empty walls in shadow. This technique, called “wall grazing,” involves placing the light very close to the wall to accentuate its texture, which can turn a boring flat wall into a feature of its own.
Your Uplighting Playbook: A Checklist for Fixing Common Venue Flaws
- For Unsightly Wall Patterns: Use a saturated color wash (deep amber, rich blue) to “paint” over the pattern with light, effectively making it disappear.
- For Boring, Featureless Walls: Place uplights very close to the wall to create a “wall grazing” effect. This highlights any subtle texture in the surface, creating dramatic vertical shadows and visual interest.
- For Large, Unappealing Rooms: Practice selective illumination. Light only the attractive architectural features (columns, archways, windows) and leave the uninteresting walls in shadow to shrink the feel of the space.
- For Low Ceilings: Use wide-beam uplights aimed to spread horizontally. This can create the illusion of wider, and by extension, higher walls.
- For Dated Decor & Colors: Use a new color palette with uplighting to completely transform the room’s scheme. A 1980s mauve can become a sophisticated blush or a modern amber with the right gel or LED color.
Uplighting is your secret weapon. It allows you to take control of a venue’s aesthetic, directing your guests’ attention to the beauty you want them to see and masking everything you don’t.
By mastering these technical principles of color, direction, and layering, you can move beyond simple decoration and truly design your wedding’s atmosphere. To ensure these complex elements are executed flawlessly, the logical next step is to consult with a professional lighting designer who can translate this vision into a technical reality.