Strategic uplighting is not about painting walls with color; it’s an event technology used to architecturally sculpt a space and choreograph its emotional energy throughout the night.
- The biggest mistake is over-saturating colors, which makes a wedding look like a nightclub. The professional standard is a balance of 80% soft, desaturated light with 20% saturated accents.
- Lighting techniques like “grazing” on textured walls and creating a “visual hierarchy” can turn a generic ballroom into a bespoke, high-end venue without changing any physical decor.
Recommendation: Instead of thinking “what color?”, ask “what atmosphere do we want to create at each stage of the event?” and build a lighting timeline from there.
When couples imagine transforming a wedding venue, their minds often jump to flowers, linens, and elaborate centerpieces. The walls, however, are typically seen as a fixed canvas—something you either accept or pay a fortune to drape in fabric. But what if you could repaint your entire venue, shift its mood from intimate to electric, and direct your guests’ attention with surgical precision, all without a single drop of paint? This is the promise of strategic LED uplighting, an often-underestimated tool of modern event production.
The common approach to uplighting is to simply pick a color from the wedding palette and flood the room with it. This is the equivalent of a painter using only one color for an entire masterpiece. It lacks depth, nuance, and emotion. The true power of this technology lies in understanding light as a medium—a way to perform architectural and emotional engineering. It’s about more than just color; it’s about intensity, placement, and timing. It’s the difference between a room that’s just ‘blue’ and a room that feels serene, then romantic, then vibrant, guiding your guests through a carefully planned experience.
This guide moves beyond the basic “how-to” of renting uplights. We’ll explore the technical and artistic principles that event tech specialists use to transform spaces. We will deconstruct how to choose the right technology, master color theory for events, and apply production design concepts to turn even the most generic ballroom into a venue that feels uniquely and unforgettably yours. Prepare to see your venue’s walls not as limitations, but as the most dynamic decorative element you have.
This article will guide you through the essential strategies for mastering wedding uplighting. Below is a summary of the key areas we will cover, from foundational techniques to advanced design concepts, providing a clear roadmap to transforming your space.
Summary: How to Master Venue Transformation with Uplighting
- Why Uplighting Works Best on Textured Brick or Stone Walls?
- How to Choose Between Wireless Battery Uplights and Wired Systems?
- Static Color or Sound-Active Mode: Which Suits a Wedding Dinner?
- The Color Saturation Mistake That Makes Weddings Look Like Nightclubs
- How Many Uplights Do You Need to Cover a 3000 sq ft Room Effectively?
- How to Transform a Generic Ballroom Into a Bespoke Venue With Production Design?
- How to Design an Immersive Forest Theme Indoors Without Soil and Bugs?
- How to Personalize Your Reception With a Custom Vinyl Dance Floor Wrap?
Why Uplighting Works Best on Textured Brick or Stone Walls?
Not all walls are created equal in the world of lighting design. While uplighting can add a wash of color to any flat surface, its true transformative power is unlocked when it interacts with texture. Flat, painted drywall will simply reflect color, but surfaces like exposed brick, rough-hewn stone, or detailed architectural molding become dynamic canvases. The light interacts with the imperfections and contours, creating a dramatic interplay of highlights and shadows that adds immense depth and character to a room.
This technique is known in the industry as “wall grazing.” It involves placing the light source very close to the surface to accentuate its texture. In contrast, “wall washing” involves placing the light further away to create a smooth, even field of color. As lighting experts from TSG Weddings explain, the choice is strategic, involving a decision between “grazing” to exaggerate dramatic shadows versus “washing” the wall in smooth color. For a venue with beautiful inherent textures, grazing is almost always the superior choice, turning a simple wall into a major design feature.
To achieve this effect, the placement and angle of the light are critical. Placing a fixture 6 to 12 inches from a brick wall and aiming it straight up will create long, dramatic shadows that highlight the mortar lines and rough texture of the bricks. Tilting the light slightly can soften this effect. The color choice also matters; warm whites and ambers are particularly effective at revealing texture, creating a rich, sophisticated look that feels organic to the space, rather than simply applied on top of it.
How to Choose Between Wireless Battery Uplights and Wired Systems?
Once you understand the desired effect, the next decision is technological: wireless battery-powered uplights versus traditional wired systems. The choice isn’t just about convenience; it has significant implications for cost, flexibility, and overall design execution. Wireless uplights offer unparalleled placement freedom. They can be placed anywhere—under tables, behind temporary fixtures, or in outdoor spaces—without worrying about proximity to power outlets or creating tripping hazards with cables. This makes them ideal for intricate designs and venues with limited power access.
However, this freedom comes at a price. As comparative data shows, wireless lights are typically more expensive to rent than their wired counterparts. Their main limitation is battery life, which usually ranges from 8 to 12 hours. While this is sufficient for most wedding receptions, it requires careful management to ensure they last through the final dance. Wired systems, on the other hand, offer unlimited runtime and a lower per-unit cost, but they tether your design to the venue’s electrical layout and require meticulous cable management to maintain a clean, safe environment.
For many weddings, the optimal solution isn’t an “either/or” choice but a strategic hybrid approach. A Phoenix wedding, for example, successfully combined systems by using cost-effective wired uplights for static architectural lighting around the room’s perimeter. They then deployed flexible, battery-powered units to highlight dynamic areas like the sweetheart table, the cake display, and the grand entrance. This hybrid strategy saved approximately $200 compared to an all-wireless setup while preserving maximum design flexibility for the most important visual moments of the evening.
This table breaks down the key decision-making factors.
| Feature | Wireless Battery Uplights | Wired LED Systems |
|---|---|---|
| Rental Cost | $23-26 per light | $17-19 per light |
| Battery Life | 8-12 hours | Unlimited |
| Setup Time | 1-2 minutes per light | 5-10 minutes per light |
| Placement Freedom | Anywhere (under tables, outdoors) | Limited by outlet locations |
| Trip Hazard Risk | None | Requires cable management |
| Weather Resistance | Most are outdoor-rated | Requires weatherproofing |
Static Color or Sound-Active Mode: Which Suits a Wedding Dinner?
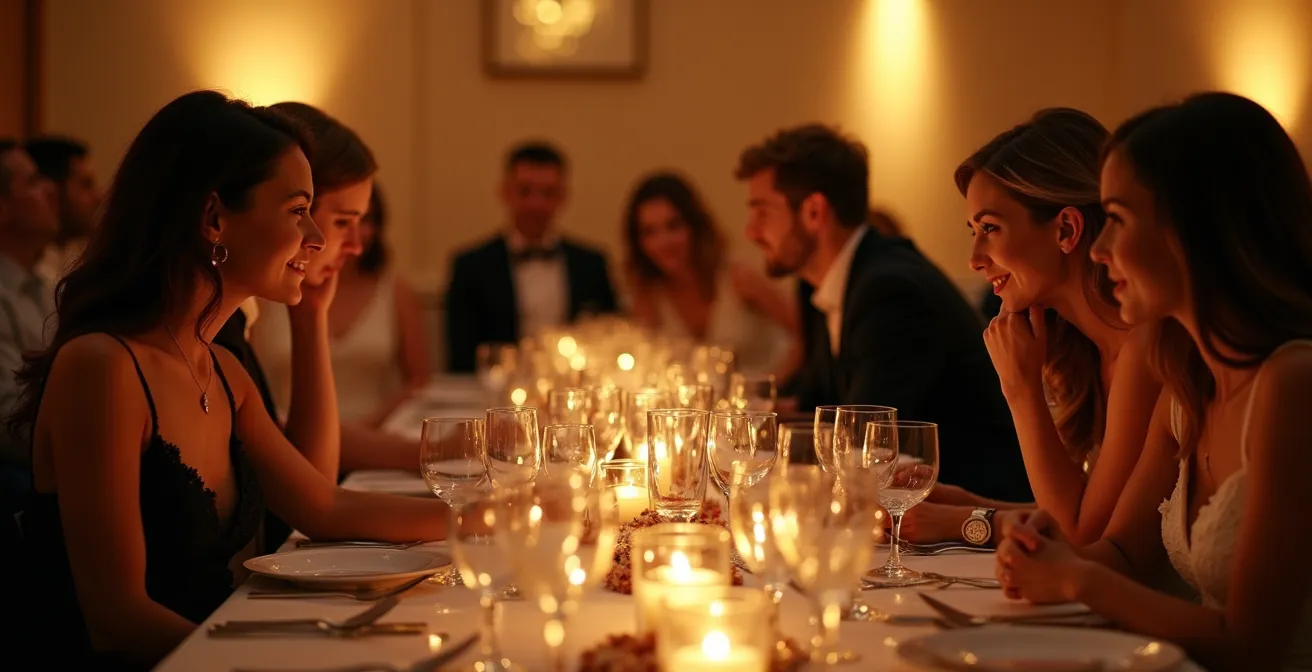
The transition from dinner to dancing is one of the most significant energy shifts at a wedding reception, and your lighting should choreograph it. The common temptation is to flip a switch from a static color to a chaotic, sound-active “party mode.” This abrupt change can be jarring. A more sophisticated approach treats the lighting as a dynamic element that evolves with the evening’s emotional arc. For the dinner portion, the goal is intimacy and conversation. Flashing lights or intense colors are distracting and unflattering. Here, a static, warm color like amber or a soft rose gold creates a welcoming and elegant atmosphere.
However, “static” doesn’t have to mean “stagnant.” Event lighting expert Amber Anderson of Heavenly Day Events champions a technique that adds a layer of subtle dynamism. As she notes, you can use subtle, almost imperceptible color shifts during the meal to evolve the atmosphere. Imagine a slow fade from a warm golden amber at the start of dinner to a soft rose gold by the time speeches begin. This “slow fade” technique keeps the environment feeling alive and progressing without ever distracting guests from their food or conversations. It’s the essence of emotional choreography through light.
When the formalities are over and it’s time to party, you can then transition to more dynamic modes. But even here, “sound-active” isn’t the only option. Many professional systems can be programmed for controlled color changes or synced to a DJ’s tempo control, ensuring the energy builds in a structured way rather than descending into random flashing. This deliberate progression makes the “party mode” feel like a climactic, earned moment in the evening’s story.
Action Plan: Your Wedding Reception Lighting Timeline
- Cocktail Hour: Set a welcoming atmosphere with a static warm amber light (around 2700K). This creates an inviting glow for guests as they arrive and mingle.
- Dinner Service: Execute a subtle, pre-programmed fade from amber to a soft rose gold over the course of 90 minutes. The change should be too slow for guests to notice consciously.
- First Dance: Transition to a more romantic color wash, such as a deep purple or soft blue, to create a focused, memorable moment on the dance floor.
- Party Time: Enable a controlled color-changing mode. If possible, sync it to the DJ’s tempo control for a cohesive audio-visual experience, allowing the energy to build with the music.
The Color Saturation Mistake That Makes Weddings Look Like Nightclubs
Perhaps the single most common mistake in wedding uplighting is choosing a color and cranking its saturation to 100%. While a deep, vibrant magenta or electric blue might seem bold and exciting, in practice, it often overwhelms a space, flattens architectural details, and casts unflattering light on guests. This is what gives a sophisticated wedding the unintended and often tacky aesthetic of a nightclub. The secret to elegant and impactful lighting design isn’t the hue itself, but the mastery of saturation.
Professional lighting designers operate on a principle of balance. Instead of drenching a room in one intense color, they use a layered approach. A widely accepted guideline is the 80/20 rule. According to expert recommendations, a high-end look is achieved by using 80% soft, desaturated light with 20% saturated accent colors. The desaturated tones (like pastels, soft whites, or blush tones) create the overall ambiance and wash the main walls, providing an elegant backdrop. The highly saturated colors are then used sparingly as accents to draw attention to specific features like the cake, a floral arrangement, or an architectural column.
The case of Tori and Tiara’s wedding provides a perfect example of this principle in action. They chose purple for their uplighting, a color that can easily look harsh. However, by opting for a desaturated, softer lavender tone, they created an atmosphere that was elegant and elevated, not overwhelming. The softer lighting enhanced their wedding photos by providing a beautiful color cast without creating strange skin tones, and it maintained a sense of sophistication throughout the entire reception. Their choice demonstrates that subtlety is often more powerful than intensity.
How Many Uplights Do You Need to Cover a 3000 sq ft Room Effectively?
After deciding on technique and color, the most pressing practical question becomes: “How many lights do I need?” The answer depends on the effect you want to achieve—a full-room color wash versus accenting specific features. For an even, consistent wash of color around the perimeter of a room, most lighting professionals recommend spacing uplights at 1 light per 6 to 12 feet of wall space. Closer spacing (6-8 feet) creates a more intense and seamless look, while wider spacing (10-12 feet) produces distinct “pillars” of light. For a 3000 sq ft room (roughly 200 guests), this translates to a range of 16-30 lights, depending on the room’s dimensions and desired intensity.
However, quantity is not the ultimate measure of success. As wedding lighting expert Rob Alberti wisely states, “8 lights on beautiful columns can be more effective than 20 on flat, boring walls.” This highlights the core principle of strategic lighting: it’s not about how many lights you have, but where you put them. If your venue has stunning architectural features like pillars, archways, or a grand fireplace, concentrating your lights there will yield a far greater impact than spreading them thinly across uninteresting drywall. The goal is to enhance the venue’s best features, not just to fill space with light.
To make planning easier, rental companies often provide guidelines based on guest count and venue size. These charts are a great starting point for budgeting and initial planning, but they should always be adapted to your specific venue and design goals. A room with many windows or dark-colored walls will require more lights to achieve the same level of brightness as a room with light, reflective surfaces.
This table provides a solid starting point for determining your lighting needs based on room size.
| Guest Count | Venue Size | Minimum Lights | Optimal Coverage |
|---|---|---|---|
| 50 guests | 1000 sq ft | 8-10 lights | 15-18 lights |
| 100 guests | 2000 sq ft | 12-16 lights | 20-24 lights |
| 200 guests | 3000 sq ft | 16-20 lights | 24-30 lights |
| 300+ guests | 4000+ sq ft | 24-30 lights | 30-40 lights |
How to Transform a Generic Ballroom Into a Bespoke Venue With Production Design?
Many couples find their dream venue is a “blank slate” ballroom—functional but lacking in character. This is where uplighting transcends decoration and becomes full-scale production design. The key is to think in layers and create a visual hierarchy, a technique used by designers to guide the eye and create points of interest. Instead of washing the entire room in a single color, you strategically use different lighting elements to define zones and build depth.
The foundational layer is the ambient uplighting. This is your general color wash, typically using a soft, desaturated color like amber or blush to set the overall mood. This might account for about 60% of your lights. The second layer involves pin-spotting, which uses narrow, focused beams of light to highlight key elements you want guests to notice: the intricate details of the wedding cake, the lush floral centerpieces on each table, or the sweetheart table. This targeted light makes these elements “pop” from the background.
The third layer adds texture and architectural interest where there is none. This is done with gobo projectors, which are lights that project patterns (or monograms) onto walls, ceilings, or the dance floor. Projecting a subtle leaf pattern on the ceiling or a damask texture on a plain wall can instantly add sophistication and character. Finally, the most overlooked element of lighting design is the strategic use of darkness. Don’t be afraid to leave certain areas unlit. This can help hide undesirable features like service doors or a drab corner, while making the illuminated areas feel even more special and intentional.
How to Design an Immersive Forest Theme Indoors Without Soil and Bugs?
Creating a thematic wedding, like an enchanted forest, inside a traditional ballroom presents a unique challenge. Physical decor like trees and foliage can be costly, messy, and impractical. This is a perfect scenario to use light as the primary decorative medium. With a combination of color washes, gobo projections, and atmospheric effects, you can create a deeply immersive environment that feels more magical than a literal interpretation ever could.
The foundation of the indoor forest is a color palette of greens, ambers, and blues. Gobo projectors become your foliage, casting dappled leaf patterns across the walls, ceiling, and dance floor to mimic sunlight filtering through a canopy. The key to making it believable is choreographing the light to evolve over the evening, simulating a full day’s cycle. For instance, an Arizona Grand Resort wedding created a convincing forest by starting with a cool blue wash and a light haze effect for guest arrival, suggesting a misty dawn. As the evening progressed to dinner, the lighting shifted to a warm amber “golden hour,” creating an intimate and romantic glow.
For the dancing portion, the lighting design transitioned into a deep blue “moonlight” effect, punctuated by twinkling star patterns projected onto the ceiling. This carefully planned lighting choreography did more than just decorate the room; it transported guests into a narrative. The space felt alive and dynamic, changing with the mood of the event. This approach is not only more cost-effective than hauling in dozens of real trees, but it also creates a more magical and controlled sensory experience, free from soil and unwanted critters.
Key Takeaways
- Lighting is an architectural tool: Use “grazing” on textured surfaces to create depth and drama, transforming plain walls into features.
- Choreograph the emotion: Use a “slow fade” of colors during dinner and a planned lighting timeline to guide the energy of the event, rather than abruptly switching modes.
- Saturation is key: Avoid the “nightclub look” by using desaturated colors for general ambiance and saving vibrant, saturated colors for small, strategic accents (the 80/20 rule).
How to Personalize Your Reception With a Custom Vinyl Dance Floor Wrap?
The dance floor is the heart of the reception, and personalizing it can make a massive impact. A custom vinyl dance floor wrap—often featuring a monogram, a unique pattern, or a full-color image—is a popular way to do this. However, to ensure this investment looks its best, it must be integrated with your lighting plan. The finish of the vinyl wrap, whether matte or gloss, will interact with light in dramatically different ways. As event expert Kevin Dennis points out, it’s crucial to be choosing a wrap finish specifically based on your lighting plan to avoid unwanted glare. A gloss finish will reflect colored uplighting, creating a vibrant, mirror-like effect, while a matte finish will absorb light, providing a softer, more even look that’s ideal for photography and avoiding distracting reflections.
For tech-savvy couples looking for a more dynamic and flexible alternative, projection mapping offers an exciting frontier. Instead of a static vinyl sticker, this technique uses a high-powered projector to cast an image or animation directly onto a plain white dance floor. This approach provided one couple with incredible flexibility: they projected their elegant monogram onto the floor during dinner. Then, as the party started, the monogram seamlessly transformed into vibrant, animated patterns that moved with the music. The projector rental, at around $200, was more cost-effective than a custom-printed vinyl wrap and offered a level of dynamism that a static element could never achieve.
This technology effectively turns the dance floor into a digital canvas, allowing for multiple designs throughout the night. It’s a perfect fusion of personalization and entertainment, ensuring the central space of your reception evolves with the energy of the celebration. Whether you choose vinyl or projection, aligning your floor design with your lighting strategy is the key to creating a cohesive and stunning visual experience.
Ultimately, transforming your venue with light is about shifting your mindset from decoration to design. By leveraging these strategic principles—sculpting with texture, choreographing emotion, mastering color, and creating a visual hierarchy—you elevate lighting from a simple add-on to the most powerful tool in your design arsenal. Start planning your lighting with the same intention you plan your menu or your music, and you will create an atmosphere that your guests will not just see, but feel.