A stunning custom dance floor is a technical success, not just a design choice; its perfection hinges on surface integrity, material science, and contract diligence.
- Surface preparation is non-negotiable; an uneven, dirty, or recently waxed floor guarantees adhesion failure and a ruined look.
- The design’s impact depends on its interaction with light and cameras, making the choice between matte and gloss a critical technical decision.
- Your vendor contract is as important as the design itself, with hidden removal fees and damage liability clauses that can turn a dream into a budget nightmare.
Recommendation: Vet your venue’s floor and your vendor’s contract with the same forensic scrutiny you apply to your monogram design to ensure a flawless, photo-ready result.
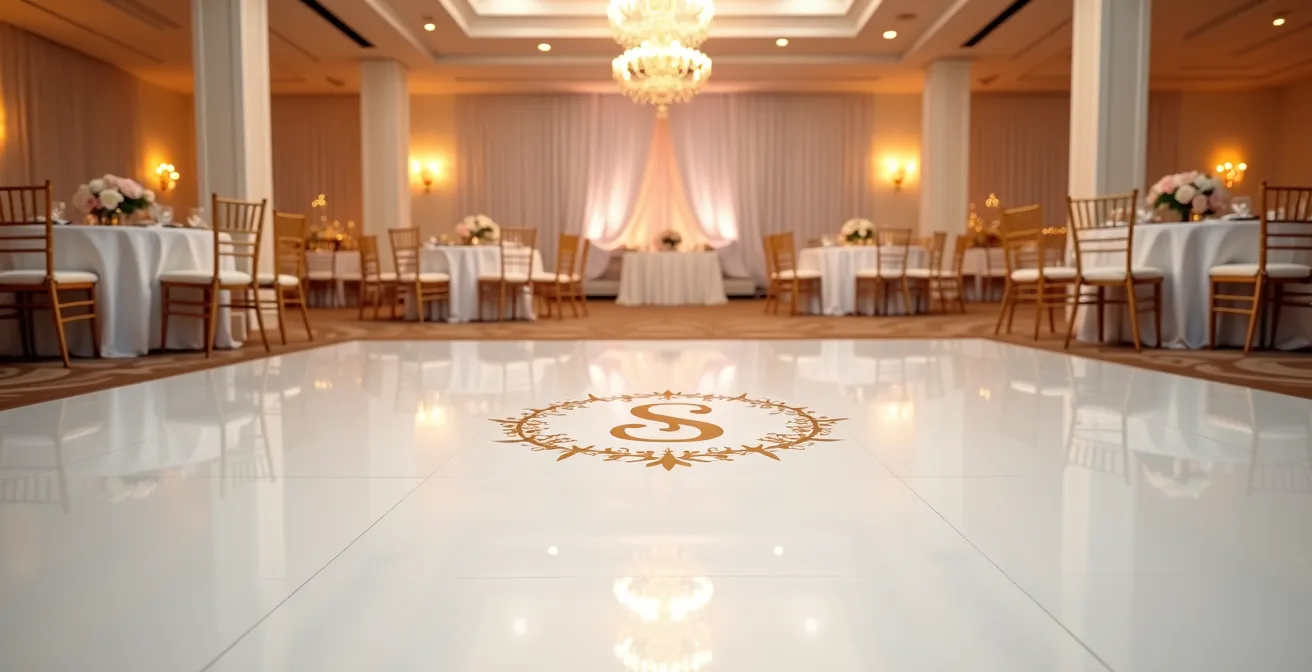
That jaw-dropping, perfectly executed monogram on a pristine white dance floor is the focal point of countless dream wedding Pinterest boards. It promises a bespoke touch, a centerpiece that transforms a generic venue into a space that is unequivocally yours. For couples who envision their unique pattern or brand as the heart of the party, a custom vinyl dance floor wrap seems like the ultimate statement piece. It’s a powerful tool to elevate the reception aesthetic and create an unforgettable experience.
The common advice is to simply pick a design, send it to a vendor, and watch the magic happen. But from a print and graphics specialist’s perspective, this view is dangerously simplistic. The difference between a flawless, magazine-worthy installation and a bubbly, scuffed, or hazardous mess lies in a series of technical details that are often overlooked. True personalization goes beyond the graphic; it involves a deep understanding of materials, surface compatibility, lighting physics, and contractual obligations.
But what if the key to a perfect custom floor wasn’t just the beauty of the design, but the mastery of its execution? This guide bypasses the fluff and dives into the critical, design-focused considerations that ensure your investment pays off. We will deconstruct the process, from verifying your venue’s surface integrity and preventing damage before the first dance, to understanding the photogenic qualities of different finishes and navigating the hidden costs in your contract. It’s time to think like a designer and a technician to create a truly impeccable centerpiece.
This article will guide you through the essential checkpoints for commissioning a custom vinyl dance floor. By understanding the technical nuances and potential pitfalls, you can ensure your vision is executed flawlessly, creating a stunning and safe focal point for your celebration. The following sections break down every critical step, from initial floor vetting to final lighting coordination.
Summary: A Technical Guide to the Perfect Custom Vinyl Dance Floor
- Why Vinyl Wraps Fail on Uneven or Carpeted Surfaces?
- How to Prevent Scuff Marks from Ruining the Monogram Before the First Dance?
- All-White Floor or Custom Pattern: Which Is More Photogenic?
- The Removal Fee Hidden in Your Vinyl Flooring Contract
- How to Ensure Your Glossy White Floor Is Not a Slip Hazard?
- How to Transform Your Venue Walls With Strategic LED Uplighting?
- How Your Invitation Suite Sets the Tone Before Guests Even Arrive?
- The Reflection Mistake That Makes Mirror Seating Charts Unreadable
Why Vinyl Wraps Fail on Uneven or Carpeted Surfaces?
The single most critical factor for a successful vinyl dance floor wrap is not the quality of the vinyl or the precision of the print; it is the surface integrity of the floor beneath it. A vinyl wrap is essentially a giant, high-tack sticker. For perfect adhesion, it requires a surface that is perfectly smooth, clean, non-porous, and dimensionally stable. Any deviation from this ideal is a direct invitation for failure. Uneven surfaces, such as those with tiles that have deep grout lines, warped wooden planks, or low spots, create air pockets. These pockets are weak points that will inevitably lead to bubbling, lifting, and tearing under foot traffic.
Carpet is an absolute non-starter. The pliability and porous texture of carpeting prevent the vinyl adhesive from creating a uniform bond. The wrap will shift, wrinkle, and bunch, creating a significant tripping hazard and looking unprofessional within minutes. Even low-pile commercial carpet is unsuitable. The success of your custom floor is therefore entirely dependent on the quality of the venue’s existing floor. Before you even sign a contract with a vinyl vendor, a thorough vetting of the venue’s surface is a non-negotiable first step. Failure to do so is the most common and costly mistake a couple can make.
Your Action Plan: Venue Floor Vetting Checklist Before Vinyl Installation
- Ask the venue manager: ‘When was the floor last waxed or refinished?’ Recent waxing can release chemicals that prevent proper vinyl adhesion.
- Request floor material specifications: ‘What is the exact material composition of the dance floor?’ Certain sealants or finishes can be incompatible with vinyl adhesives.
- Inspect for surface irregularities: Get on your hands and knees to check for low spots, uneven areas, or previous damage that could compromise the wrap.
- Test surface compatibility: Ask the venue for permission to have your vendor test a small, 6×6 inch adhesive sample in an inconspicuous area for 24 hours to check for reactions or adhesion failure.
- Document existing conditions: Take detailed photos and videos of the floor surface before installation. This protects you from liability if the venue claims the wrap caused pre-existing damage.
How to Prevent Scuff Marks from Ruining the Monogram Before the First Dance?
You’ve invested in a pristine, custom-printed monogram, only to have it scuffed and dirtied by vendor carts and crew footsteps before guests even arrive. This is a common and entirely preventable tragedy. The key to protecting your investment lies in two areas: installation timing and the choice of material finish. Professionals are unanimous on one point: the vinyl dance floor wrap must be the absolute last decorative element installed in the reception space. All tables, chairs, lighting, and floral arrangements should be in place first. Once the wrap is down, the area must be roped off and declared a “no-go zone” for all other personnel.
This strict timeline prevents heavy carts, ladders, and dirty work boots from ever touching the finished surface. The second line of defense is your choice of finish. While a high-gloss floor delivers a spectacular, reflective shine, it is also a magnet for showing every single scuff and smudge. A matte finish, on the other hand, is far more forgiving. According to insights from vendors like WeddingWrapStudio on Etsy, matte offers a subdued look that hides minor scuffs better, while glossy gives a shiny finish that requires more careful handling. If your priority is a flawless look that lasts through the night, a matte or satin laminate over your print is the superior technical choice.
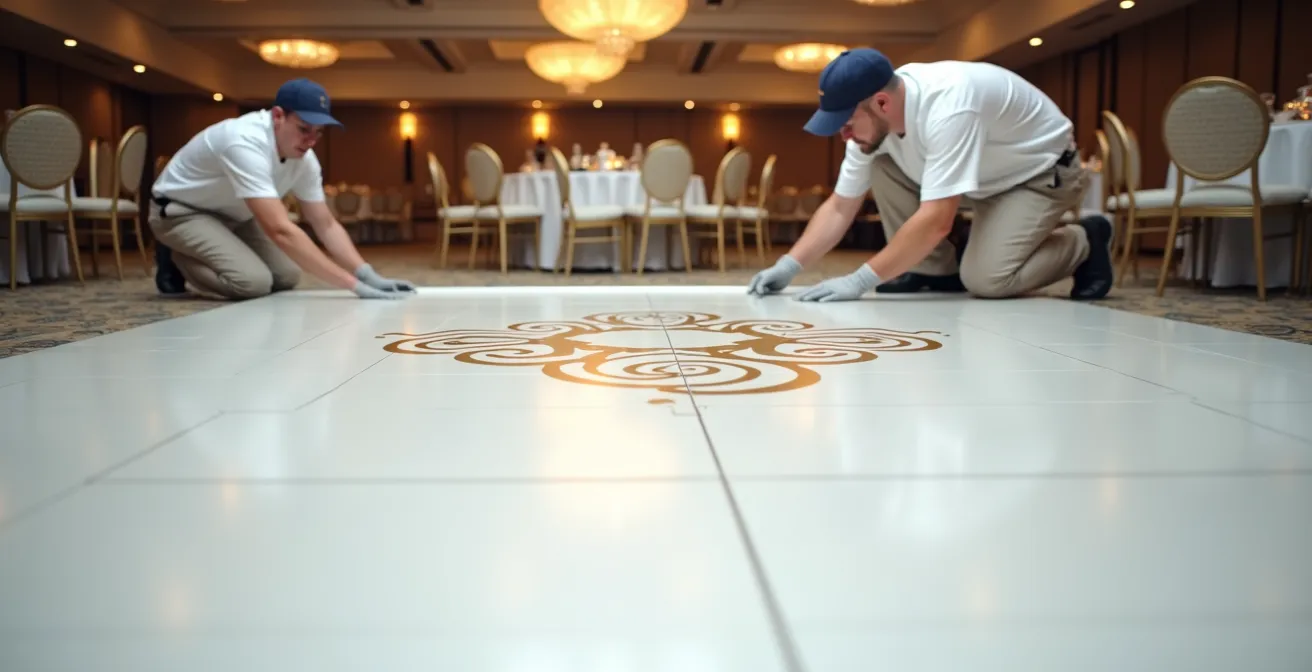
The image of professionals carefully applying a protective film underscores the importance of this final step. This temporary shield is the ultimate insurance policy for your floor, staying on until the moment the doors open for your guests. It ensures that the first time anyone steps on your custom monogram is for the first dance, just as you envisioned. This level of coordination with your planner and vinyl vendor is paramount.
All-White Floor or Custom Pattern: Which Is More Photogenic?
The choice between a classic, all-white floor and a bold, custom pattern is a major design decision with significant photographic and videographic consequences. It’s not simply a matter of taste; it’s about understanding how each surface interacts with light and cameras. An all-white floor acts as a massive light reflector. This can be a huge advantage, as it bounces light around the room, softens shadows, and creates a bright, airy, and timeless look in photos. It puts the focus squarely on the couple and their guests, which is why it remains a classic, high-end choice.
A custom pattern, however, introduces complexity. While it adds immense visual interest and reinforces your theme, it can also compete with your attire, your floral decor, and even complex lighting designs. For videographers, busy, high-contrast patterns can sometimes create an undesirable moiré effect—a distracting, wavy pattern that appears when the camera sensor’s grid clashes with the pattern on the floor. A floor with an Art Deco geometric or a dense floral print might look stunning in person but can be problematic on video. The decision requires a trade-off between in-person impact and on-camera performance.
This table breaks down the key considerations to discuss with your photographer and wedding planner. As outlined in guidance from wedding experts, the possibilities are vast, but each has technical implications.
| Feature | All-White Floor | Custom Pattern Floor |
|---|---|---|
| Light Interaction | Acts as massive reflector, brightens room | May clash with complex lighting designs |
| Video Quality | Clean, timeless look focusing on couple | Can create distracting moiré effect |
| Theme Versatility | Works with any wedding theme | Must match specific theme (Art Deco, etc.) |
| Photography Impact | Creates bright, airy photos | Adds visual interest but can compete with attire |
The Removal Fee Hidden in Your Vinyl Flooring Contract
The most beautiful custom dance floor can leave a bitter aftertaste if you’re hit with an unexpected bill after the wedding. One of the most frequently overlooked aspects of a vinyl wrap contract is the removal fee. Many couples assume the installation price includes take-down and disposal, but this is often not the case. Some vendors treat removal as a separate, costly line item, which can add anywhere from $500 to $1,000 to your final invoice. It’s a classic “hidden fee” that can derail your budget if not addressed upfront.
Beyond the removal fee, a robust contract should also protect you from other potential liabilities. What happens if the vinyl adhesive damages the venue’s expensive hardwood floor? Your contract must include a ‘surface damage liability’ clause, confirming the vendor carries adequate insurance to cover such incidents. This is not the place to simply trust a verbal assurance. With the significant investment involved, where the average cost is between $3,000 and $4,000, a detailed contract is your primary form of protection. Scrutinize every line before signing.

Before finalizing your decision, you must meticulously review the vendor’s agreement. Look for these specific points to ensure you are fully protected and there are no financial surprises after your big day. A proactive approach to the contract is as crucial as the design process itself.
- ‘Removal and disposal included’ clause: If this is not explicitly stated, assume you will be charged extra.
- ‘Surface damage liability cap’: Ensure the vendor’s insurance is sufficient to cover the full replacement cost of the venue’s floor, not just a small, capped amount.
- ‘Installation timeline guarantee’: The contract should specify a penalty if a late installation disrupts your event schedule.
- ‘Venue approval documentation’: The vendor, not you, should be responsible for getting the venue’s official sign-off on the materials and process.
How to Ensure Your Glossy White Floor Is Not a Slip Hazard?
A high-gloss white dance floor is the epitome of chic, but its slick surface can pose a significant safety risk, especially when drinks are spilled and the dancing gets energetic. Ensuring guest safety is paramount, and it requires more than just hoping for the best. From a technical standpoint, slip resistance is a measurable characteristic. Professional-grade safety flooring is rated on a PTV scale (Pendulum Test Value), and industry standards for commercial spaces demand materials that can achieve a PTV36+ rating for sustainable slip resistance. While most decorative vinyls won’t meet this rigorous standard, you should still ask your vendor about the slip-resistance rating of their materials.
Reputable installers have developed strategies to mitigate the risks associated with glossy surfaces. The most effective solution is the application of a specialized slip-resistant laminate over the printed vinyl. This clear topcoat adds texture and grip to the floor without significantly dulling the glossy finish. It’s an extra step and an added cost, but it’s essential for peace of mind. Additionally, creative solutions can help manage the environment. Some forward-thinking planners and installers recommend setting up “flip-flop stations” near the dance floor. This encourages guests to trade their slippery dress shoes for more secure footwear, reducing the risk of falls while adding a fun, thoughtful touch to the event. The combination of material science and practical planning is the key to a safe and stunning dance floor.
How to Transform Your Venue Walls With Strategic LED Uplighting?
While the dance floor is the focal point, its impact is exponentially magnified when coordinated with the room’s lighting. Strategic LED uplighting does more than just add color; it “paints” the space and directs the eye, creating a cohesive and immersive environment. The interaction between your floor and your lighting should be a primary design conversation. A common mistake is choosing a lighting color that clashes with or cancels out the design of the floor wrap. The two elements must work in harmony.
The guidance from lighting experts is clear and direct, as they often advise on how to enhance the floor’s features. As one wedding lighting design expert notes:
If the wrap has a gold monogram, use warm golden uplighting. If the floor is all-white, use colored uplighting to ‘paint’ the floor.
– Wedding Lighting Design Expert, Strategic Uplighting for Dance Floor Enhancement
This synergy is crucial. Furthermore, lighting offers a brilliant solution for venues where a vinyl wrap is not feasible due to carpeted floors or restrictive policies. A GOBO (Goes Before Optics) projection can cast a custom monogram or pattern directly onto the dance floor using light. This technique creates a similar personalized effect without any physical installation. It’s a versatile and often more affordable alternative that provides a sharp, dynamic focal point, proving that sometimes the best “wrap” is made of light itself.
How Your Invitation Suite Sets the Tone Before Guests Even Arrive?
The first impression of your wedding’s aesthetic isn’t when guests walk into the reception; it’s when they open your invitation. The invitation suite is the prologue to your event’s story, and establishing design continuity between your paper goods and your large-scale décor, like a dance floor wrap, creates a powerful and sophisticated brand for your wedding. This isn’t just about using the same colors. It’s a technical process that starts with your graphic designer.
To ensure a perfect match, your monogram or custom pattern must be created as a vector graphic (in file formats like .AI or .EPS). A vector file can be scaled to any size—from a 2-inch seal on your invitation to a 20-foot monogram on the dance floor—without any loss of quality or sharpness. A standard image file (like a .JPG or .PNG) will become pixelated and blurry when enlarged, resulting in an unprofessional look. This is a crucial technical detail that must be communicated to your stationer from day one.
Furthermore, color matching requires precision. The Pantone color code used for the ink on your invitations should be the same one provided to the vinyl printing company. This ensures your specific shade of blush pink or navy blue is identical across all mediums. To achieve true design harmony, follow these steps:
- Insist on identical monogram designs for both the invitation envelope liner and the dance floor center.
- Ensure all design elements are created as scalable vector graphics.
- Match exact Pantone colors between paper and vinyl printing specifications.
- Request physical vinyl color samples from the floor vendor to compare against your invitation paper samples before giving final print approval.
Key Takeaways
- Surface is everything: An uneven, dirty, or improperly prepared floor is the number one cause of vinyl wrap failure. Vetting the venue’s floor is your most critical first step.
- The contract is king: Your vendor’s contract must be scrutinized for hidden removal fees and surface damage liability clauses to avoid thousands in surprise costs.
- Design is holistic: True design continuity starts with a vector file. Your dance floor graphic must be technically aligned with your paper goods and lighting for a cohesive, professional look.
The Reflection Mistake That Makes Mirror Seating Charts Unreadable
The same physics of light that can render a mirrored seating chart unreadable in a brightly lit entryway can also impact the look of your dance floor. Understanding how different surfaces reflect light is a master-level design consideration. A high-gloss black or dark-colored vinyl floor can essentially act as a giant, dark mirror. While this can create a dramatic, moody effect, it also means it will reflect everything on the ceiling: light fixtures, exit signs, fire sprinklers, and unattractive ceiling tiles. This can clutter your photos with distracting visual noise that you never intended to be part of your decor.
This is where the choice between glossy, satin, and matte finishes becomes a critical technical decision, not just an aesthetic one. A high-gloss surface creates specular reflections (mirror-like), while a matte surface creates diffuse reflections (scattering light evenly). For photography and videography, a matte or satin finish is almost always the safer and more versatile choice. It absorbs unwanted reflections and prevents “hotspots”—blown-out, overly bright spots in photos caused by direct light hitting a glossy surface. While a high-gloss finish can deliver stunning results under perfectly controlled, diffused lighting, it is far less forgiving in a dynamic event environment. By choosing a finish with minimal reflection, you gain maximum control over your final visual aesthetic.
Ultimately, a custom dance floor is a canvas, but its success is painted with technical precision. By moving beyond a purely aesthetic viewpoint and embracing the role of a detail-oriented project manager, you can navigate the potential pitfalls and bring your vision to life. To start this process on the right foot, the next logical step is to begin the conversation with a print and graphics specialist who understands these critical technical nuances and can guide you from a scalable vector file to a flawless installation.