Successfully executing a suspended floral installation is not a matter of decoration, but a question of structural engineering and meticulous production planning.
- Any installation over 50 lbs requires a certified rigging specialist to calculate load distribution and ensure structural integrity.
- A strict “top-down” installation schedule—rigging first, flooring and tables last—is non-negotiable to prevent delays and safety hazards.
Recommendation: Prioritize engaging a production specialist to create a formal rigging plan before finalizing your floral design to ensure your vision is both breathtaking and fundamentally safe.
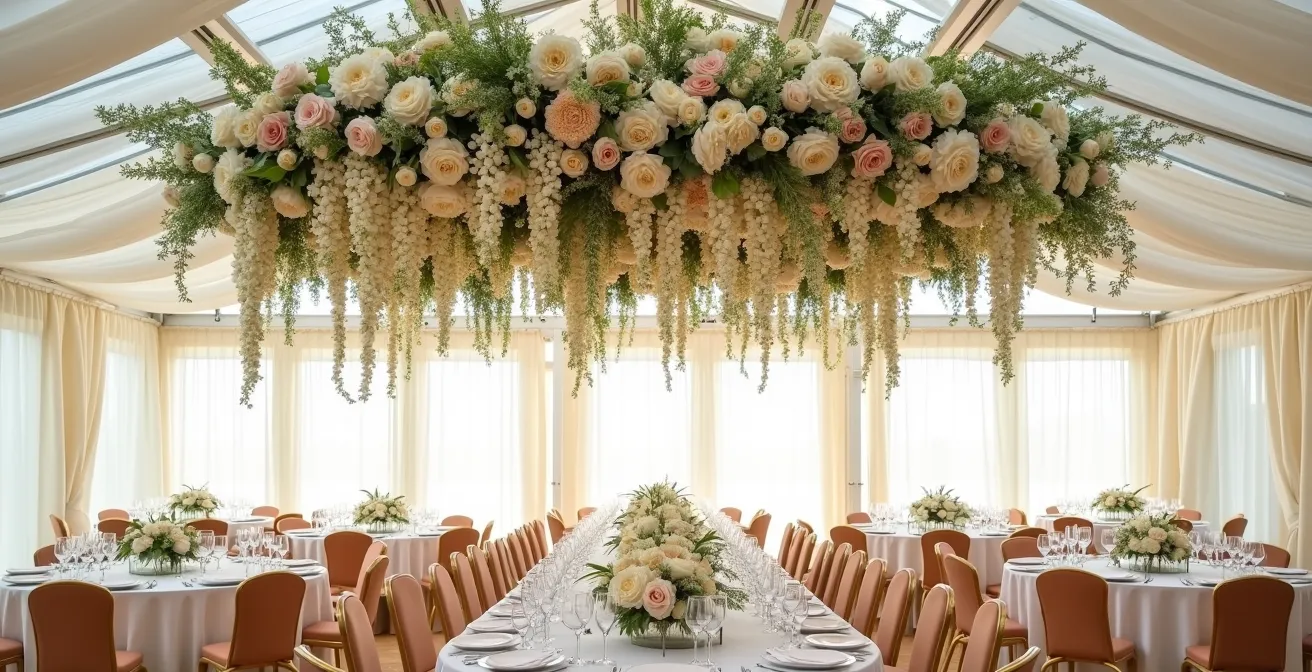
The vision is captivating: a lush, suspended canopy of foliage and blooms transforming the ceiling of a marquee into a living sky. For couples dreaming of a “greenhouse” wedding, this element creates an unparalleled sense of intimacy and wow-factor, lowering the vast vertical space of a tent into a romantic haven. This single feature can define the entire atmosphere of your event, enveloping guests in a truly immersive, botanical world.
However, the common advice often stops at “hire a good florist” or “use a sturdy frame.” This dangerously oversimplifies a complex task. While a florist is essential for the artistry, the structural and logistical execution falls squarely into the realm of technical production. The difference between a stunning success and a catastrophic failure lies not in the choice of flowers, but in the engineering, physics, and sequencing behind the installation.
This guide moves beyond aesthetics to address the critical production principles. We will not be discussing flower pairings; we will be dissecting the engineering. The true key to a successful hanging installation is treating it as a specialized construction project. This perspective shift is fundamental to ensuring the safety of your guests, the integrity of the structure, and the flawless execution of your day.
We will deconstruct the process from a production specialist’s viewpoint, covering the non-negotiable role of a rigging expert, the technical methods for keeping florals fresh without risk, the strategic budget decisions, the critical path of the installation schedule, and the environmental controls—lighting and heat—that ensure the installation remains perfect from the first guest’s arrival to the last dance.
Summary: Engineering a Safe and Stunning Suspended Floral Ceiling
- Why You Need a Rigging Specialist for Any Floral Install Over 50 lbs?
- How to Keep Hanging Flowers Fresh Without Dripping Water on Guests?
- Central Feature or Scattered Foliage: Which Maximizes Budget Impact?
- The Installation Schedule Mistake That Delays Table Setting
- How to Weave Fairy Lights Into Foliage Clouds for Nighttime Magic?
- How to Create Realistic Wisteria Clouds for a Fairytale Wedding Ceiling?
- The “Greenhouse Effect”: Managing Heat in Clear-Span Marquees
- How to Use Mood Lighting to Hide Venue Flaws and Enhance Photos?
Why You Need a Rigging Specialist for Any Floral Install Over 50 lbs?
Any suspended installation, especially one composed of water-soaked foam, foliage, and fixtures, quickly exceeds what can be considered simple decoration. Once the total weight surpasses 50 lbs, it enters the domain of structural engineering. The forces at play—tension, shear, and dynamic load—demand professional assessment. A rigging specialist is not merely a “handyman”; they are a certified professional trained in load calculation, material strength, and suspension mechanics. Their role is to ensure the marquee’s framework can support the proposed weight and to design a safe system for hoisting and securing it.
The concept of a safety factor is paramount. Standard industrial rigging often uses a 5:1 safety factor for materials. However, for anything suspended over an audience, professional standards are far more stringent. In regions like Ontario, a 10:1 safety factor is required for any element suspended over people. This means a 200 lb installation must be supported by a system capable of holding 2,000 lbs. This is not a matter for guesswork. A qualified rigger will provide a written rigging plan detailing attachment points, hardware specifications, and certified load capacities, ensuring full compliance and peace of mind. While standards like the ASME B30.5 require qualified riggers for heavy crane operations, the principle of using certified personnel for overhead loads is a universal best practice in event production.
Action Plan: Vetting Your Rigging Specialist
- Verify their NCCCO certification level (Level I for basic setups, Level II for complex, multi-point installations).
- Request proof of liability insurance specifically covering work in temporary structures.
- Ask for a portfolio showcasing previous floral installations, which have unique challenges compared to standard stage rigging.
- Confirm their experience with your exact marquee type, as rigging in a clear-span frame tent differs significantly from a traditional pole tent.
- Insist on receiving a written rigging plan with explicit load calculations and documented safety factors before any work begins.
How to Keep Hanging Flowers Fresh Without Dripping Water on Guests?
The challenge of a suspended floral installation is twofold: maintaining the beauty of the flowers while ensuring the comfort and safety of the guests below. Water is essential for freshness but poses a significant risk if not managed correctly. Dripping water can ruin a guest’s attire, damage table settings, and create slip hazards. The solution lies in using targeted, self-contained hydration systems rather than large, soaked blocks of floral foam which can leak under gravity and heat.
Advanced floristry techniques for large-scale installations focus on individual stem hydration. This method not only prevents drips but also allows for more artistic and natural-looking arrangements. Hardy flowers that can last for over 24 hours without a direct water source, such as roses, carnations, and certain orchids, should form the backbone of the design. For more delicate stems, a sealed, localized water source is the only professional option.
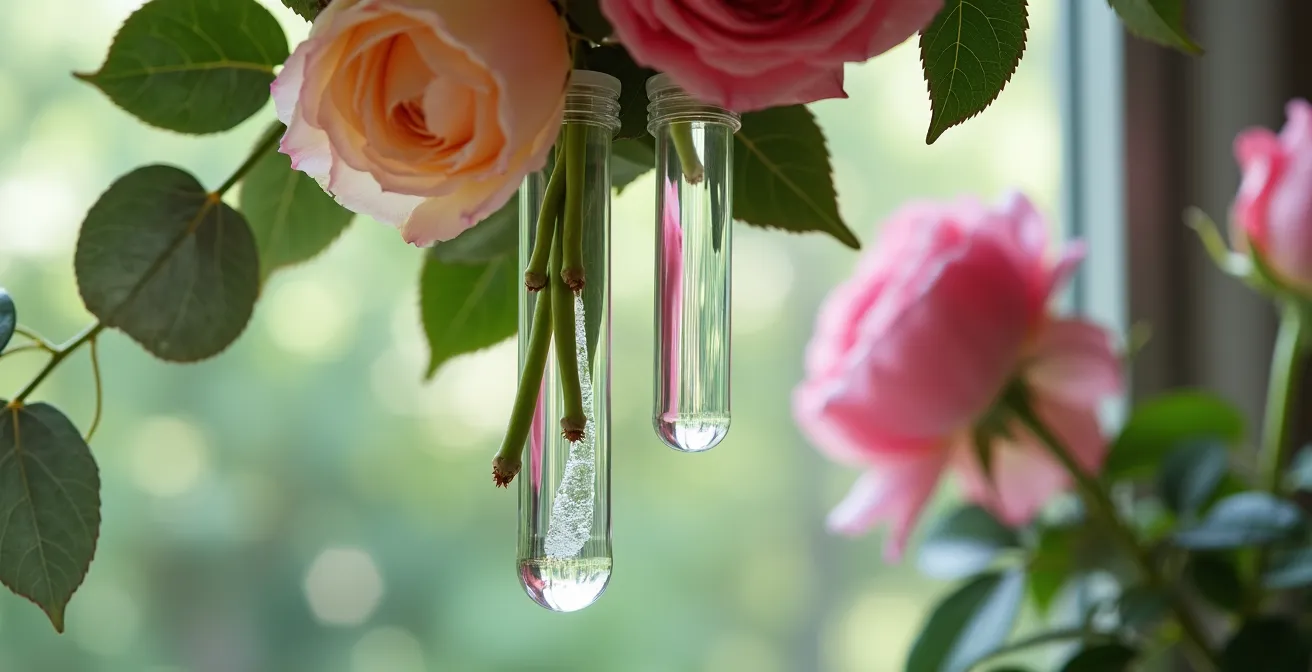
As seen in the detail above, the professional standard involves attaching miniature water tubes or vials directly to the end of each stem that requires hydration. These small reservoirs provide enough water to keep the bloom fresh for the duration of the event without any risk of leakage. Other methods include wrapping stem bases in soaked agri-wool or moss, which is then hermetically sealed in plastic wrap before being integrated into the design. Proper preparation, including hydrating all flowers for a full 24 hours before installation, is also critical to maximizing their longevity.
Central Feature or Scattered Foliage: Which Maximizes Budget Impact?
When planning a “greenhouse” marquee, the allocation of the floral budget is a strategic decision that dramatically affects the overall feel of the space. The choice is often between a single, large-scale central installation or multiple, smaller clusters of foliage scattered throughout the ceiling. While scattering elements may seem like it covers more area, a concentrated, central feature almost always delivers a greater return on investment in terms of visual impact and guest experience.
A singular, dramatic installation over a key area—such as the dance floor, head table, or bar—creates a powerful focal point. It’s an immediate “wow” moment that draws the eye upward, defines the space, and provides a spectacular backdrop for photographs. Spreading the same budget across numerous smaller pieces dilutes this impact, resulting in an ambiance that is pleasant but rarely breathtaking. From a production standpoint, a central installation is also more efficient, often requiring a single, robust rigging point and a more streamlined installation process compared to the multiple points and extended time needed for scattered elements.
The following table, based on common industry observations, breaks down the strategic advantages of each approach. A recent comparative analysis of marquee decor confirms that budget concentration leads to a stronger overall impression.
| Factor | Central Installation | Scattered Elements |
|---|---|---|
| Visual Impact | Creates dramatic focal point and clear photo opportunity | Provides overall ambiance but lacks wow factor |
| Cost Efficiency | Better value – concentrated budget creates stronger impression | Budget spread thin across multiple pieces |
| Installation Time | Single rigging point, faster setup | Multiple rigging points, longer installation |
| Repurposing Potential | Can be repositioned as single statement piece | Individual elements easier to redistribute |
| Guest Experience | Creates Instagram-worthy moments | Subtle enhancement throughout space |
The Installation Schedule Mistake That Delays Table Setting
The single most critical—and often overlooked—aspect of a successful marquee event with suspended decor is the installation schedule. A common and disastrous mistake is failing to implement a strict top-down sequencing protocol. Any and all overhead work, including the installation of rigging points and the hoisting of floral arrangements, must be completed before any ground-level elements like flooring, tables, or chairs are brought into the space. Attempting to install a heavy, messy floral piece above beautifully set tables is a recipe for delay, damage, and immense stress.
The correct procedure is methodical and prioritizes safety and cleanliness. The marquee structure itself is the first element. Immediately following, the rigging team installs all ceiling hardware. Only then does the floral team lift and secure the installation. Once all overhead work is finished and the area is cleared of lifts and ladders, the flooring can be laid. This ensures the floor remains clean and undamaged. Finally, tables, chairs, and all other decor are positioned. Adhering to this schedule prevents dirt, water, and stray leaves from contaminating linens and centerpieces, and eliminates the logistical nightmare of navigating furniture during a complex aerial installation.
A professional production timeline will look like this:
- Day 1: Marquee structure is erected and secured by the tent company.
- Day 2 Morning: The production team installs all ceiling rigging and suspension points. This happens before flooring is laid.
- Day 2 Afternoon: The main floral installation is lifted into place and fully secured.
- Day 2 Late Afternoon: With all overhead work complete, the flooring is installed.
- Day 3 Morning: The event planner and rental company can now position tables and chairs on a clean, finished floor.
- Day 3 Afternoon: The catering and floral teams complete table settings, linens, and any ground-level decor.
How to Weave Fairy Lights Into Foliage Clouds for Nighttime Magic?
Integrating lighting into a suspended floral installation transforms it from a daytime feature into a 24-hour experience, creating breathtaking nighttime magic. The goal is a “lit-from-within” effect, where the light seems to emanate organically from the foliage. However, this combination of electricity and potentially damp organic material requires an uncompromising focus on safety. As noted by experts at The Knot, weaving lush blooms with statement lighting creates grand, totally immersive design elements, but it must be done correctly.
The first rule is to use only low-voltage LED light strings, typically 12V or 24V. These systems dramatically reduce the risk of fire and electrical shock compared to standard 120V alternatives. Furthermore, all connectors must be IP65-rated or higher, signifying they are waterproof and protected against condensation, which is inevitable in a marquee environment. For the most seamless effect, the light strings should be attached directly to the installation’s structural frame *before* any foliage is added. This allows the wires to be hidden deep within the structure.
For ambiance, the color temperature of the light is critical. A warm white light (2700K-3000K) creates a romantic, candle-lit glow that beautifully complements flowers and skin tones. Cooler white lights (4000K+) should be avoided as they can make flowers look sterile and unflattering. Finally, installing a dimmer control, accessible from ground level, is essential. This allows the lighting intensity to be programmed and adjusted throughout the event—soft and romantic for dinner, then brighter and more energetic for dancing, ensuring the magic lasts all night.
How to Create Realistic Wisteria Clouds for a Fairytale Wedding Ceiling?
Creating a suspended wisteria installation that feels genuinely ethereal and not artificial is a masterclass in texture, layering, and controlled imperfection. The goal of a “wisteria cloud” is to mimic nature’s organic growth. The most common mistake is using a rigid, straight grid as a base and hanging stems at uniform lengths, which results in a stiff, manufactured look. A truly realistic effect starts with an irregular foundation and embraces variation.
A professional florist will create a more natural base using intertwined birch or manzanita branches instead of a metal grid. This immediately introduces organic shapes and textures. The key to a believable cascade is the “Layered Lengths Method.” This involves meticulously layering wisteria stems of different sizes to create depth and movement. A mix of at least five different lengths, ranging from two to six feet, should be used. The shortest stems are attached near the center of the installation to build density, while the longest, most dramatic stems are placed along the outer edges to create a soft, trailing effect.
To achieve this fairytale look, several artistic and practical techniques are combined:
- Material Blending: Combine high-quality silk wisteria (around 60%) with fresh wisteria (40%). This provides longevity and durability while the fresh elements add authentic texture and scent.
- Color Variation: Blend three to four subtle color variations—such as ivory, soft lilac, and a deeper lavender, with hints of green foliage—to mimic the natural color shifts in a real plant.
- Density Fluctuation: Vary the density of the stems across the installation. Denser clusters mixed with sparser areas create a more believable, organic rhythm.
- Ethereal Accents: Weaving in delicate, trailing ribbons or sheer organza fabric can enhance the sense of movement and add another layer of dreamy texture.
Key Takeaways
- Rigging is Engineering: Any suspended floral installation is a structural load, not just decor. A certified rigger and a formal plan are non-negotiable for safety.
- Sequence is Everything: A strict “top-down” installation schedule (rigging > florals > flooring > furniture) is the only way to prevent costly delays and damage.
- Control the Environment: The ‘Greenhouse Effect’ in a clear marquee is a real threat to your florals. Proactive heat and lighting management are as crucial as the installation itself.
The ‘Greenhouse Effect’: Managing Heat in Clear-Span Marquees
A clear-span marquee is the perfect choice for creating a “greenhouse” aesthetic, but it comes with a literal greenhouse effect. The clear vinyl or glass panels trap solar radiation, causing temperatures inside the marquee to rise significantly, especially during a sunny day. This poses a serious threat to the longevity of your suspended floral installation. The heat can cause flowers to wilt, droop, and expire hours before the event even begins. This is not just an aesthetic issue; it’s a matter of floral science.
The optimal environment for preserving cut flowers is cool and humid. In fact, research on floral preservation shows that a temperature of 36°F with 90-95% humidity can extend the life of blooms up to three times longer. While achieving these exact conditions in a wedding marquee is impossible, it highlights the danger of letting the internal temperature soar. A proactive thermal management strategy is therefore not an option, but a necessity to protect your investment.
An experienced production team will implement a multi-pronged heat management plan:
- Timing: Install the flowers during the coolest part of the day, typically in the very early morning or even overnight.
- Ventilation: Open panoramic windows or side walls early in the morning to allow built-up heat to disperse before guests arrive and the sun is at its peak.
- Shading: Strategically use clear roof panels only over areas like the dance floor, while using lined (opaque) roof sections over dining areas. Temporary translucent shading films or suspended fabric sails can also be used to diffuse direct sunlight over the installation.
- Air Circulation: Position industrial-grade fans to circulate air, but ensure they are not aimed directly at the flowers, which could cause dehydration.
- Monitoring: Assign a staff member the specific task of monitoring the marquee’s internal temperature and adjusting ventilation throughout the day as conditions change.
How to Use Mood Lighting to Hide Venue Flaws and Enhance Photos?
Lighting within a marquee is not just for illumination; it is a powerful tool for storytelling and misdirection. In a space that can often be a “blank canvas,” strategic lighting directs the guests’ gaze, establishes the mood, and transforms a simple structure into a dramatic environment. It is your primary method for highlighting the features you love, like a stunning floral ceiling, while concealing less desirable elements, such as floor imperfections or the marquee’s structural poles.
The core principle is to draw the eye upward. By positioning uplights at the base of the marquee’s vertical supports, you create pillars of light that guide attention towards the ceiling and away from the floor. To specifically enhance your suspended installation, narrow-beam “pin spots” should be installed on the ceiling and precisely aimed to illuminate the floral arrangement. This makes the installation pop, turning it into the undeniable centerpiece of the room, especially after dark. The color of this light is crucial; a warm white between 2700K and 3000K provides a romantic, candle-lit ambiance that is flattering for both flowers and photography.
A sophisticated lighting plan creates distinct zones within the marquee to guide the guest experience. You might have bright, welcoming light at the entrances, soft and intimate lighting over the dining tables, and dynamic, color-changing lights for the dance floor. Coordinating with your photographer is a critical step. They can help identify the key locations for photo moments—the head table, the cake cutting area, the first dance spot—which should be prioritized as focal points in your lighting design. This ensures that your most important memories are captured in the best possible light, with your beautiful installation as the perfect backdrop.
To ensure your vision of a stunning, suspended floral ceiling becomes a flawless and safe reality, the next logical step is to engage a technical production specialist. They can collaborate with your florist and marquee provider to develop a comprehensive rigging, scheduling, and environmental plan tailored specifically to your venue and design.