The secret to a lively wedding dinner isn’t awkward icebreaker games; it’s a tablescape designed with psychological precision to make conversation feel natural and inevitable.
- Physical space dictates social dynamics; table width and centerpiece height are either bridges or barriers to connection.
- Layered textures and personalized details act as sensory anchors, keeping guests engaged and providing subtle talking points.
Recommendation: Shift your focus from simply decorating a table to architecting a social experience where every element has a purpose in bringing people together.
There’s a moment at many wedding receptions that couples dread. It’s after the applause has faded and the main course is served. A quiet stiffness settles over some tables, punctuated by the clinking of cutlery. Guests smile politely at their tablemates, but the conversation feels stilted, obligatory. You fear your carefully planned celebration will become a sequence of polite but boring moments. The common advice is to scatter conversation-starter cards or rely on a “fun” seating chart, but these often feel like forced interventions in a moment that should be effortless.
But what if the solution wasn’t in adding another task for your guests to perform, but in the very environment you’ve built around them? What if the texture of the linen, the width of the table, and the height of the floral arrangements were doing the social work for you? The key to a vibrant, interactive reception lies in a more subtle, powerful approach: a form of subconscious social engineering. This is the art of using design not just for aesthetics, but to intentionally dismantle social barriers, trigger sensory engagement, and make genuine connection the path of least resistance. It’s about becoming a dining psychologist, observing how humans interact with space and curating every detail to foster warmth and community.
This guide will walk you through the psychological principles of tablescape design. We will explore how to manipulate space to encourage intimacy, use textures to ground your guests in the moment, and design a place setting that acts as a personal anchor. Prepare to see your tables not as static displays, but as dynamic ecosystems for human connection.
To help you master this art, this article breaks down the core components of social table design. The following sections will guide you through each strategic element, from the foundational dimensions of your tables to the final, evolving details that last through dessert.
Summary: The Architect’s Guide to Socially Engineered Tablescapes
- Why a 48-Inch Wide Table Kills Conversation Across the Aisle?
- How Layering Textures on the Table Keeps Guests Subconsciously Engaged?
- The 14-Inch Rule: How to Style Tables Without Blocking Eye Contact?
- Place Card or Menu: Which Element Anchors the Personal Experience Best?
- Why Uncomfortable Chairs Empty Your Dance Floor Earlier?
- How to Arrange Cocktail Tables to Encourage Mixing Between Families?
- How to Make Low Centerpieces Look Expensive and lush?
- How to Design a Tablescape That Survives a 4-Course Fine Dining Service?
Why a 48-Inch Wide Table Kills Conversation Across the Aisle?
The most fundamental element of your tablescape isn’t the flowers or the candles; it’s the physical distance between your guests. The science of proxemics, which studies how humans use space, provides a clear explanation. We subconsciously categorize the space around us into zones: intimate, personal, social, and public. A standard 48-inch (4-foot) wide table places guests sitting opposite each other squarely at the outer limit of the “personal zone” and the beginning of the “social zone.” A study of proxemics research by Edward T. Hall defines this social distance as starting from 4 feet, a range more suited for consultations or group discussions than for the intimate rapport you want at a wedding.
At this distance, conversation requires more effort. Voices must be raised, and non-verbal cues are harder to read, creating a subtle psychological barrier. The conversation naturally defaults to the person sitting beside you, fragmenting the table into smaller, disconnected groups. This is why a seemingly small choice in table dimension can have a profound impact on the overall energy of the room. A narrower table, around 36-40 inches, pulls guests into a more comfortable personal distance, making cross-table conversation feel effortless and inclusive.
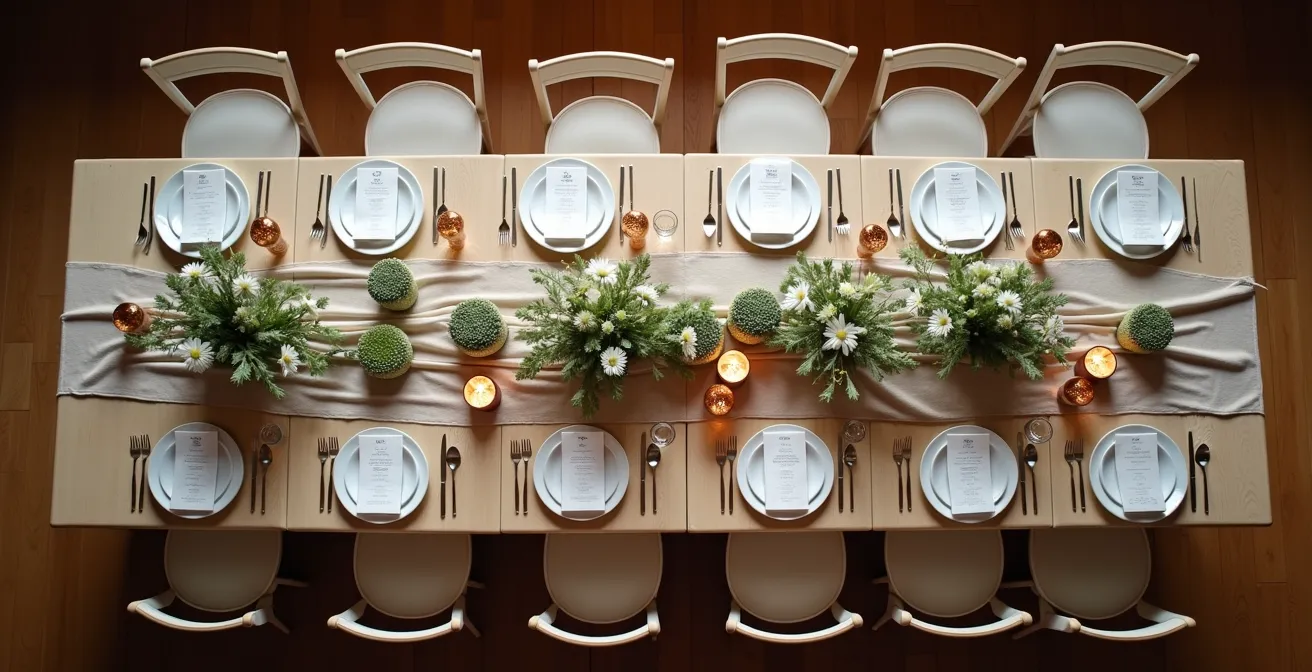
If you must use wider tables, especially for family-style service, you can counteract this effect. Create visual bridges with low, continuous runners or garlands that draw the eye across the expanse, psychologically shortening the distance. Furthermore, consider positioning place cards to encourage diagonal conversations rather than just direct across-table interactions, creating a more dynamic and interwoven social web.
How Layering Textures on the Table Keeps Guests Subconsciously Engaged?
In a world of digital distractions, a powerful way to keep guests present and engaged is through their sense of touch. A tablescape rich with varied textures acts as a form of sensory anchoring, grounding your guests in the physical reality of the moment. A single, uniform texture like a standard polyester linen is visually and tactilely monotonous. The hand and eye have nothing to explore, allowing the mind to wander. Conversely, a layered, multi-textural environment provides continuous, subtle sensory feedback that holds attention.
Think of it as a tactile journey. As Rea Owens-Byerly, a certified wedding designer, notes, “Texture can be found in almost any detail from the linens to the florals and even the paper details. Think of velvet linens, varied floral design, or textured stationery.” This principle was masterfully applied in a wedding featured by The Wed magazine, where designers created a stunning tactile experience. They combined the coarse feel of raw linen runners with the cool, smooth surface of marble chargers and the warmth of untreated wood. Guests, without consciously realizing it, were constantly interacting with their environment—their fingers tracing the grain of the wood or the weave of the fabric. This constant sensory input prevents the mental “checking out” that leads to lulls in conversation.
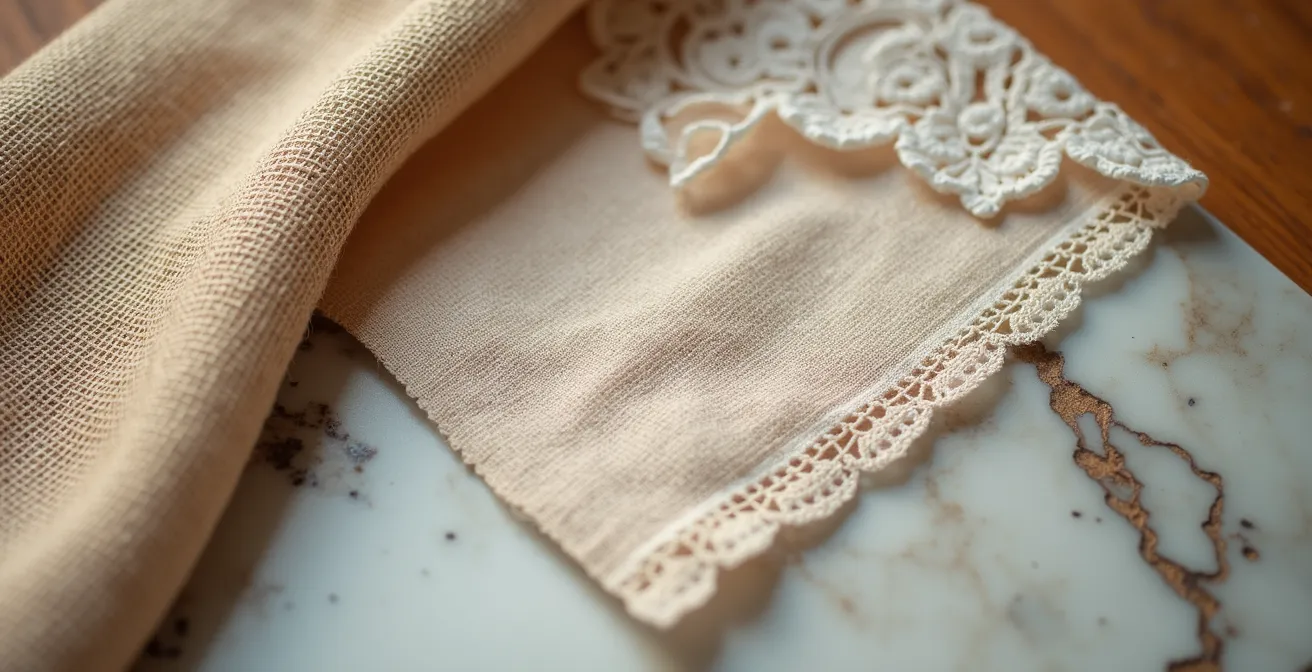
This doesn’t require an extravagant budget. It’s about intentional combinations: pairing a simple cotton napkin with a velvet ribbon, placing a smooth ceramic plate on a rough-hewn wooden charger, or using handmade paper with deckled edges for your menus. Each element provides a point of contrast and discovery, keeping the subconscious mind occupied and engaged, which in turn fosters a more alert and interactive social atmosphere.
The 14-Inch Rule: How to Style Tables Without Blocking Eye Contact?
The age-old advice to “keep centerpieces low” is correct, but it lacks the precision needed for truly effective design. The real enemy of conversation isn’t height itself, but a specific, awkward range of height. This is where the 14-Inch Rule comes into play: any decorative element between approximately 14 and 24 inches tall creates a “dead zone” directly in your guests’ line of sight. It’s too tall to see over comfortably and too short to see under, forcing people to bob and weave their heads to make eye contact. This small physical annoyance is enough to shut down cross-table conversation entirely.
Design experts confirm this with specific measurements. Guidelines suggest that short centerpieces should stay under 12 inches, while tall arrangements should begin at a minimum of 24 inches, allowing a clear window for interaction underneath. That 12-to-24-inch space is the danger zone. The 14-inch mark is a particularly common offender, as it’s a natural height for many mid-sized floral arrangements. By adhering to this rule, you ensure that the primary channel for human connection—eye contact—remains open and unobstructed.
The ideal height and diameter of your centerpiece also depend on your table size and shape. A tiny 8-inch arrangement would look lost on a large 72-inch round table, while a sprawling 20-inch diameter piece would overwhelm a small bistro table. The key is achieving a balance between making an impact and preserving social space. The following table offers a practical guide for sizing your centerpieces.
| Table Size | Seats | Ideal Height | Diameter |
|---|---|---|---|
| Small Round (36-48″) | 2-4 | 8-12″ | 10-14″ |
| Medium Round (54-72″) | 6-8 | 12-20″ | 12-18″ |
| Large Round (72-96″) | 10-12 | 18-24″ | 20-24″ |
By using this data-driven approach, you move from vague aesthetic preference to strategic spatial planning, ensuring your beautiful decor enhances, rather than hinders, the social experience.
Place Card or Menu: Which Element Anchors the Personal Experience Best?
At each guest’s seat lies an opportunity: to present them with a generic setting or to give them a personal anchor that makes them feel seen and valued. Both the place card and the menu can serve this purpose, but their impact on social dynamics differs. The menu is about the shared experience to come, outlining the courses everyone will enjoy. The place card, however, is about the individual. It says, “We thought specifically of you and prepared this spot for you.” This small gesture of personalization is a powerful social primer.
In the hierarchy of anchoring a personal experience, a well-executed place card often wins. It’s the first thing a guest seeks out, and it’s a tangible affirmation of their welcome. When that card is thoughtfully designed, it becomes a social catalyst. A simple, elegant card is lovely, but an interactive or unique one can spark the first conversation at the table. This was demonstrated brilliantly in a wedding featured by Gathurr, where the couple used “Narrative Menus” that doubled as place cards. Each one not only had the guest’s name but also a short line about their connection to the couple and a unique icebreaker question for that specific table. This transformed a static piece of paper into an active tool for connection, giving guests an immediate and personal reason to engage with their neighbors.
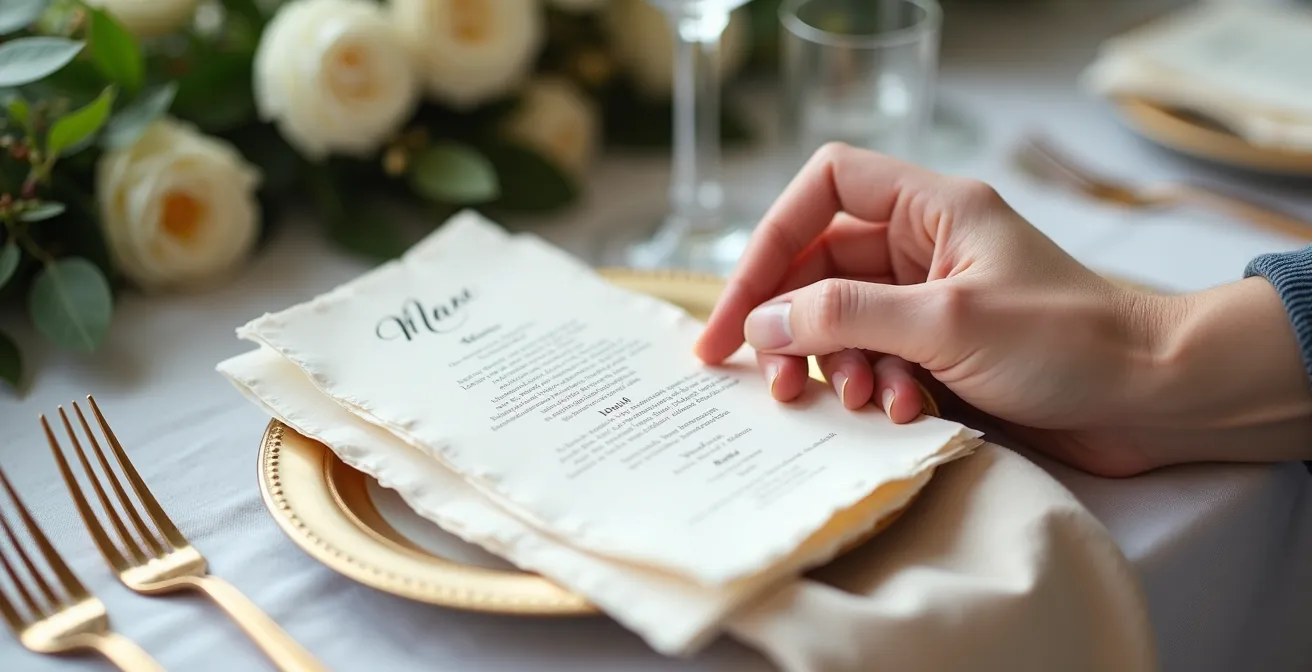
The key is to think of these paper goods not as logistical necessities, but as the first gift you give your guests. The menu sets the stage for the culinary narrative of the evening, but the place card initiates the personal one. By imbuing the place card with a touch of story, personality, or interactivity, you provide an anchor that makes each guest feel individually cherished, creating a foundation of warmth and welcome from which conversation can easily blossom.
Why Uncomfortable Chairs Empty Your Dance Floor Earlier?
The success of your reception’s later hours—the dancing, the lingering conversations—is decided long before the music starts. It’s decided during dinner, by the chairs your guests are sitting in. Physical discomfort is a powerful motivator. A guest seated in a narrow, unpadded, or restrictive chair will begin to feel restless. Their focus shifts from the conversation to their own physical state. They’ll shift their weight, stretch their legs, and, at the first socially acceptable opportunity, they will stand up. Once they are up, they are less likely to sit back down, and more likely to head for the exit.
An uncomfortable chair shortens a guest’s “endurance.” It’s not just about the seat itself, but the space around it. Wedding design experts recommend a minimum of 24-30 inches of space per guest at a table. Anything less creates a sense of being crowded and restricted, leading to what psychologists call “behavioral sink”—a breakdown of normal social graces due to overcrowding. Guests can’t relax their arms or move freely, which adds to their physical and psychological discomfort, hastening their desire to leave the table.
To combat this, you must design a “comfort journey” for your guests that evolves with the evening. The goal is to match their physical needs to each phase of the reception. A chair that provides upright support is perfect for dining, but as the evening transitions to a more relaxed phase, that same posture can feel rigid. By planning for this evolution, you extend your guests’ comfort and, consequently, their presence on the dance floor.
Your Action Plan: The Guest Comfort Journey
- Upright Support for Dining: Start with chairs that encourage good posture during the meal service to facilitate digestion and conversation.
- Transition to Lounge Mode: After the main course, have staff add plush cushions or have throws draped over the chairs. This visual cue signals a shift to a more relaxed, lounging phase.
- Guarantee Personal Space: Meticulously measure your place settings. Ensure each guest has at least 24 inches of elbow room and enough “knock-back” space to push their chair out without hitting another guest.
- Create ‘Comfort Zones’: In addition to the main dining chairs, set up small lounge vignettes with varied seating heights and styles away from the tables. This gives guests with different energy levels or social needs a place to retreat and recharge.
- Audit for Annoyances: Before the event, sit in every type of guest chair at a fully set table. Is there a wobble? Is the armrest at an awkward height? Does your knee hit the table leg? Eliminate these small irritants before they become major distractions.
By treating guest comfort as a strategic priority rather than an afterthought, you are investing directly in the longevity and energy of your entire celebration.
How to Arrange Cocktail Tables to Encourage Mixing Between Families?
The cocktail hour is your first and best opportunity to break down social barriers between different groups of guests, such as the couple’s separate families or different circles of friends. A poorly planned layout can reinforce these social divides, as people naturally gravitate to the familiar. The key to encouraging mingling is a strategic arrangement of space that makes it easy and non-intimidating for guests to cross invisible social lines and initiate new conversations. The goal is to create flow and “soft” destinations that draw people together.
Avoid a static, grid-like layout of identical high-top tables. Instead, think like a city planner creating a vibrant public square. The most effective approach is to create clusters of 2-3 tables, then separate these clusters with wide, open “avenues” for movement. This layout mimics natural social patterns. A single person or a couple feels much more comfortable approaching a small, existing group of two tables than they do interrupting a large, tight circle. The wide avenues ensure movement is fluid and prevent bottlenecks that can make a space feel crowded and stagnant.
Varying the types of seating is also critical. A mix of high-top cocktail tables (for standing and leaning) and lower lounge-style seating accommodates different energy levels and physical needs. A common best practice is a ratio of roughly 60% high tables and 40% lower seating. This ensures older guests or those in heels have a comfortable place to rest, while others can remain standing and mobile. Finally, position shared focal points, like a bar, a guest book, or a water station, as natural meeting spots strategically placed between the “zones” where you anticipate different families or friend groups will initially gather. This encourages them to leave their comfort zone for a common purpose, creating the perfect, low-stakes opportunity for an introduction.
How to Make Low Centerpieces Look Expensive and lush?
A low centerpiece, while ideal for conversation, can sometimes risk looking sparse or underwhelming compared to its towering counterparts. The secret to achieving a luxurious, high-end look with a low arrangement isn’t about the quantity of flowers, but the intentionality of the design. A lush appearance comes from three key principles: density, monochromatic confidence, and the integration of unexpected materials.
First, embrace density. A tightly packed arrangement will always read as more opulent than a sparse one with lots of visible greenery or gaps. Floral designer Rachel Cho captures this perfectly:
A dense, tightly packed mass of a single, high-quality bloom reads as more intentional and luxurious. The density signals abundance and opulence, while the monoculture shows restraint and confidence.
– Rachel Cho, Rachel Cho Floral Design
This “monoculture” approach is a powerful tool. Instead of a mix of many different, less expensive flowers, a mass of a single type of bloom—like tulips, ranunculus, or hydrangeas—creates a bold, unified statement that feels confident and chic. The eye registers the sheer volume and quality of the chosen flower, which translates to a perception of luxury.
Finally, elevate the arrangement by moving beyond basic greenery. Instead of standard foliage, consider creating a continuous tablescape where multiple low arrangements are connected by a trail of a single, beautiful element. This could be a cascade of elegant eucalyptus, a trail of pearls, or even a collection of small geodes or brass objects scattered between the vessels. These precious, non-floral accents add a layer of texture and unexpected sparkle, catching the light and drawing the eye along the length of the table. This transforms a series of individual centerpieces into a cohesive, immersive landscape that feels custom-designed and expensive.
Key Takeaways
- Guest interaction is not accidental; it is a direct result of design choices that subconsciously influence behavior.
- The physical dimensions of a table and the height of its decor directly control the ease of conversation by managing sightlines and personal space.
- A successful tablescape is a multi-sensory experience that uses texture, comfort, and personalization to keep guests grounded and engaged in the present moment.
How to Design a Tablescape That Survives a 4-Course Fine Dining Service?
A tablescape for a multi-course meal is not a static portrait; it’s a living stage that must evolve. A design that looks lush and layered at the start of the reception can quickly become a cluttered obstacle course as wine glasses, multiple sets of cutlery, and bread plates accumulate. The challenge for a fine dining service is to create a design that is both beautiful and functional, a concept known as the Narrative Tablescape. This approach treats the tablescape as a story in four acts, with elements appearing and disappearing to complement the dining experience.
The core principle is “subtractive styling.” As documented by Wedding Sparrow, a successful execution of this involves designing with intentional removal points. You begin with a dense, richly layered setting. For instance, a decorative charger plate might anchor the initial look. After the appetizer course, servers clear the charger along with the plate, instantly creating more space and signaling a transition. This subtractive process continues, perhaps with a decorative overlay or runner being removed after the main course, making the table feel lighter and more spacious for dessert and coffee.
To make this work, every decorative piece should also strive for integrated functionality. Instead of purely decorative objects, use beautiful carafes for water that act as part of the centerpiece, or place artisanal salt cellars that are both visually interesting and purposeful. You can also design in “acts,” where new elements appear with specific courses. Perhaps elegant sauce boats are brought out with the main course, or a new set of smaller, moodier candles are lit just before dessert to signal a shift in atmosphere. By planning for these changes in lighting and decor, you guide the mood of the evening and maintain a sense of order and elegance, even amidst a complex service.
By shifting your perspective from that of a decorator to that of a social architect, you unlock the true potential of your wedding design. You are no longer just choosing pretty things; you are curating an environment that fosters joy, encourages connection, and creates the vibrant, love-filled celebration you’ve always envisioned. To put these principles into practice, the next logical step is to begin sketching your table layout with these psychological dimensions in mind.