The key to a stress-free wedding is not avoiding rain, but designing a rain plan so compelling it feels like a ‘Plan A-Prime’, not a disappointing ‘Plan B’.
- Paying a non-refundable tent deposit early is a smart investment in certainty that saves you from 40% rush fees and logistical chaos.
- Designing decor that is modular and weather-adaptive ensures your aesthetic is beautiful, whether indoors or out.
Recommendation: Shift your mindset from ‘what if it rains?’ to ‘when it rains, we will execute our beautiful, pre-designed intimate experience.’ This proactive approach guarantees peace of mind.
The very thought of rain on your wedding day can feel like a personal attack. You’ve envisioned sun-drenched vows and an al fresco reception, and anything less feels like a compromise. Many couples fall into a state of denial, refusing to even consider a tent deposit because it feels like admitting defeat. There’s a common saying that rain on your wedding day is good luck, but that folklore offers little comfort when you’re facing a forecast of downpours with no strategy in place. The standard advice—”have a backup plan”—is as frustrating as it is vague. It frames the alternative as a lesser option, a sad indoor replacement for your outdoor dream.
This guide offers a radical reframing. We are not creating a “Plan B.” We are designing a “Plan A-Prime”: a co-existing, equally beautiful contingency that you can pivot to with confidence, not resentment. This isn’t about compromise; it’s about control. It’s about making a strategic, proactive choice to guarantee a flawless, emotionally resonant experience, regardless of the weather. By treating your rain plan with the same creative energy as your primary one, you transform a source of anxiety into an opportunity for a uniquely cozy and intimate celebration. This is how you ensure that the only thing you need to worry about on your wedding day is enjoying it.
This article provides a complete crisis contingency framework. We will cover the precise timeline for making the final weather call, the financial and emotional wisdom of securing a tent early, and the art of designing decor that shines in any setting. You will learn how to manage guest comfort and safety with precision and, most importantly, how to instantly pivot the entire atmosphere of your event from a sunny garden party to a cozy, candlelit affair you’ll adore.
Summary: How to Create a Rain Plan You Actually Love
- When to Make the Final Rain Call: 24 Hours, 12 Hours, or 2 Hours?
- Why Paying a Non-Refundable Tent Deposit Is Better Than Last-Minute Panic?
- How to Design Decor That Works equally well Indoors and Outdoors?
- Matching Umbrellas or Ponchos: How to Move Guests Dryly?
- How to Pivot the Vibe From “Sunny Garden” to “Cozy Candlelit” Instantly?
- Why “Month-Of” Coordination Often Costs More in Stress and Money?
- At What Wind Speed Does Al Fresco Dining Become Unsafe?
- The “Greenhouse Effect”: Managing Heat in Clear-Span Marquees
When to Make the Final Rain Call: 24 Hours, 12 Hours, or 2 Hours?
The most stressful part of a rainy forecast is the indecision. Waiting until the last minute to make the call creates a frantic scramble for vendors and guests alike. A crisis planner’s approach replaces this emotional chaos with a clear, tiered decision-making timeline. This isn’t about predicting the weather with perfect accuracy; it’s about creating operational certainty at key intervals. The goal is to move from a state of “what if” to “what now” with enough time to execute your Plan A-Prime flawlessly.
Your timeline should begin 7-10 days out, with daily monitoring of extended forecasts to identify trends. Real-world wedding experiences show that couples who successfully navigate rain make a psychological shift a few days in advance. They accept the high probability of rain and begin communicating with vendors and guests. This proactive stance is crucial. For example, once it’s clear there’s a high chance of rain, an email to the guest list manages expectations and provides clear instructions. This prevents a flood of individual questions and ensures everyone knows where to go.
The “hard call” should be made with a clear threshold, typically 24-48 hours before the event. If the forecast shows a 60% or higher chance of rain, it’s time to activate Plan A-Prime. This gives your rental company, caterer, and floral designer definitive instructions, allowing for a smooth setup. Waiting until the morning of is a recipe for disaster, as vendor schedules are locked and availability evaporates. Here is a timeline to enforce:
- 7-10 Days Out: Begin daily monitoring of extended forecasts. Note the probability trends rather than focusing on a single day’s prediction.
- 48-72 Hours Before: Make the ‘soft call’. Alert your wedding planner and key vendors (venue, rentals, catering) that Plan A-Prime activation is likely.
- 24-48 Hours Before: Confirm tent availability and finalize the indoor backup space. This is your last chance to secure resources without rush fees.
- 24 Hours Before: Make the ‘hard call’. With a forecast of 60% or more, officially activate the rain plan and communicate this final decision to all vendors and guests.
- Day-Of Morning: Conduct a final weather check, not to change the plan, but to make minor adjustments, such as timing for guest arrival or moving a ceremony start time by 15-30 minutes to dodge a passing shower.
Why Paying a Non-Refundable Tent Deposit Is Better Than Last-Minute Panic?
For couples in denial about rain, a non-refundable tent deposit feels like throwing money away. The reality is the opposite: that deposit is the smartest contingency investment you can make. It’s not a bet against the sun; it’s insurance for your peace of mind and your budget. Last-minute panic is expensive. When you scramble for a tent a week before your wedding, you are at the mercy of whatever is left, assuming anything is available at all. This desperation comes with a hefty price tag.
The cost of a tent is significant, but the cost of waiting is far greater. According to recent wedding industry data, last-minute rush fees can add as much as 40% to the base price of a rental. A standard tent setup that might cost $1,500 to $6,000 with advance booking can quickly escalate. This doesn’t even include essential add-ons like sidewalls, which protect against driving rain and wind, or heaters, which are critical for guest comfort if the temperature drops. A small deposit of $500-$1500, paid months in advance, locks in your equipment, your price, and your installation team.
Beyond the financial hit, the logistical stress of a last-minute rental is immense. A professional crew with ample time can ensure a tent is installed safely, anchored correctly, and integrated seamlessly with your other vendors like lighting and catering. A rushed job is a safety risk and a logistical nightmare. The table below starkly illustrates the value of booking in advance.
| Factor | Advance Booking (4-6 months) | Last-Minute (1-2 weeks) |
|---|---|---|
| Availability | Wide selection of sizes and styles | Limited or no availability in peak season |
| Cost | Standard rates, deposit $500-1500 | Rush fees add 40% to base price |
| Setup Quality | Professional installation with proper anchoring | Rushed setup, potential safety concerns |
| Vendor Coordination | Seamless integration with other vendors | Miscommunication risks, logistical challenges |
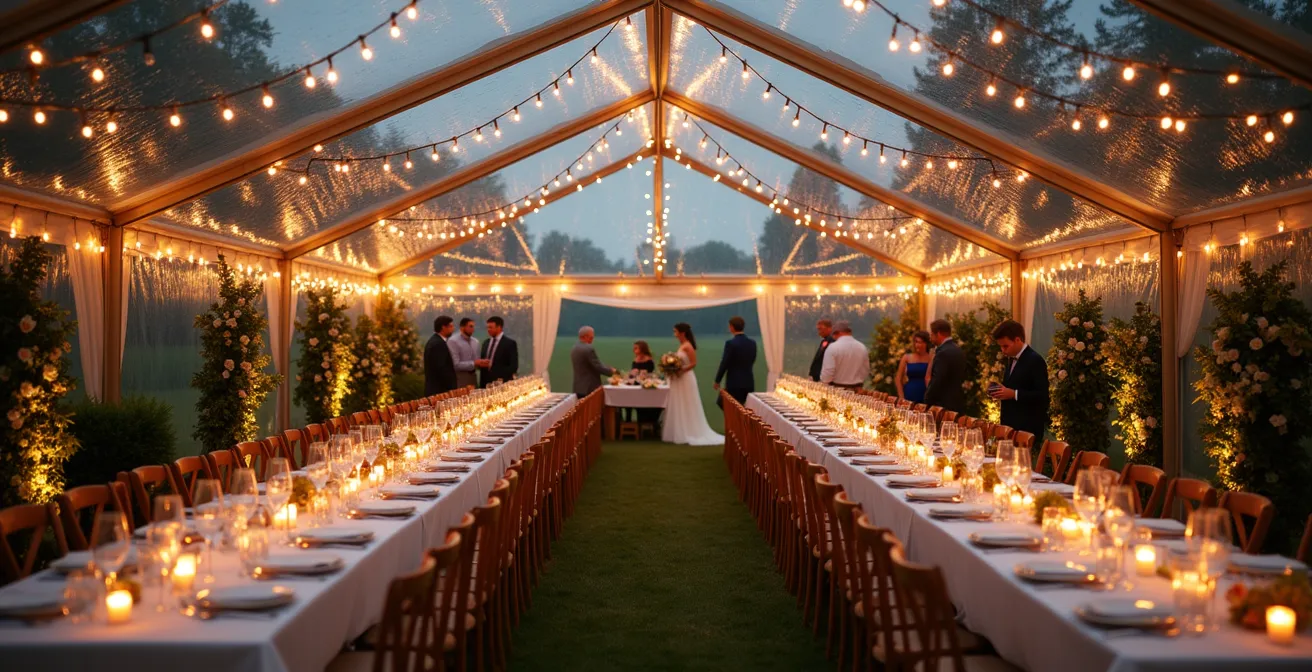
How to Design Decor That Works equally well Indoors and Outdoors?
The success of your Plan A-Prime hinges on seamless visual transition. The goal is to avoid the feeling of a “backup” by creating a cohesive aesthetic that is stunning in both your planned outdoor setting and your indoor or tented contingency space. This is achieved through Weather-Adaptive Design, where every decor choice is intentionally made for its versatility. It means choosing materials, structures, and lighting that are not dependent on a perfect, sunny day to look their best.
This starts with your core structural elements. Instead of a fixed ceremony arch that cannot be moved, consider a beautiful arch on discrete wheels or a modular design that can be reassembled indoors. Floral arrangements should be in sturdy, weighted vessels that resist wind and can be easily transported. Materials are key: opt for waterproof or resilient signage (like acrylic or painted wood) instead of paper. For lighting, LED candles and lanterns are non-negotiable; they provide the same warm glow as real flames but are completely immune to wind and rain, making them perfect for both an outdoor path and an indoor tablescape.
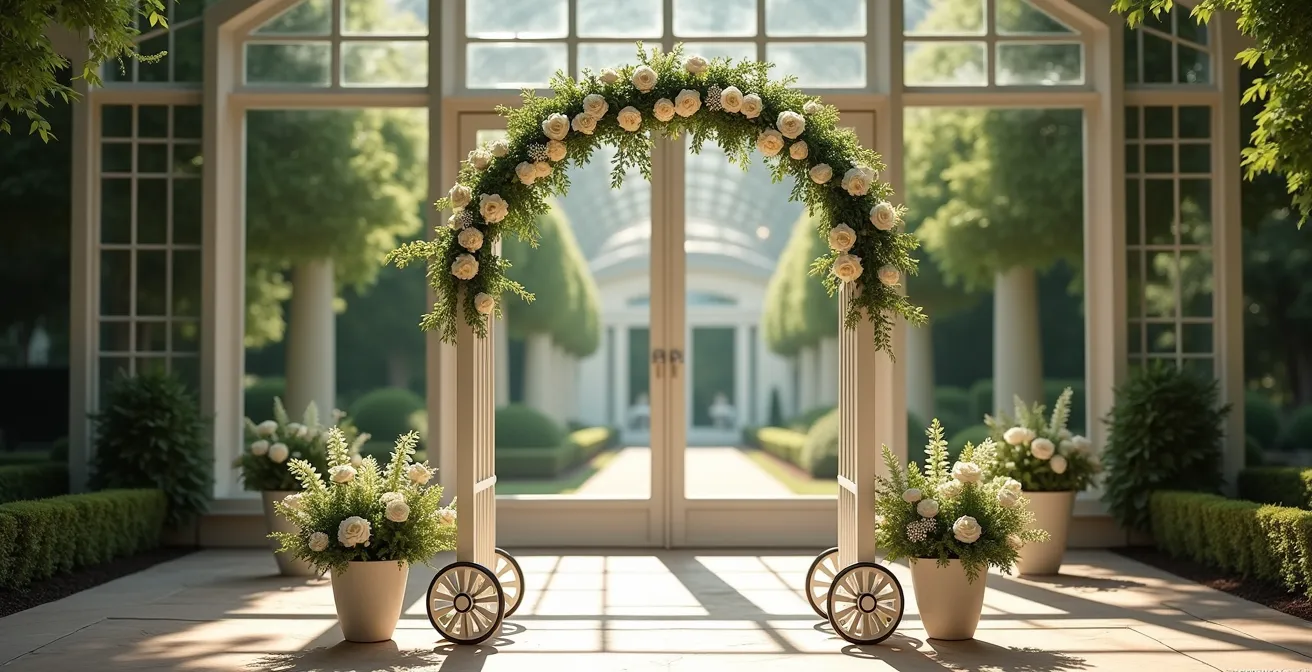
The illustration above shows this principle in action. A beautiful arch, designed for mobility, can frame your vows in a garden or create a stunning focal point inside a conservatory or tent. This modularity is the heart of a successful pivot. Your decor should feel like it was always meant to be exactly where it is. Consider these strategies:
- Choose waterproof signage and utilize sturdy floral arrangements that won’t wilt in high humidity.
- Use weighted centerpieces and decor elements to prevent them from toppling in a breeze.
- Opt for LED candles and lanterns for guaranteed, wind-resistant ambiance.
- Design key decor pieces, like your ceremony arch or welcome display, to be modular or portable.
- Select light-colored linens and fabrics that look fresh in natural daylight and also brighten up an artificially lit indoor space.
Action Plan: Auditing Your Decor for Weather Versatility
- Points of contact: List every decor element guests will see, from the welcome sign and ceremony arch to table centerpieces and cake display.
- Collect: Inventory your current ideas for each point. Are they delicate and lightweight (e.g., tall, thin glass vases) or sturdy and resilient (e.g., low, heavy ceramic bowls)?
- Coherence: Confront each item with your two potential vibes: “Sunny Garden” and “Cozy Candlelit.” Does a rustic wooden sign work for both? Does your color palette translate well from natural to artificial light?
- Mémorabilité/Emotion: Assess the impact. A heavy, wind-proof centerpiece can feel more luxurious and intentional than a flimsy one, enhancing the guest experience in any setting.
- Plan d’intégration: Identify weak points. Prioritize replacing fragile or weather-dependent items with modular, portable, and durable alternatives.
Matching Umbrellas or Ponchos: How to Move Guests Dryly?
Logistics are the backbone of guest comfort. If rain begins, your primary concern is moving people from one area to another—from parking to the ceremony, or from the ceremony to the reception tent—without them getting soaked. This is a moment of potential chaos that can be transformed into a charming, photogenic experience with the right preparation. The choice isn’t just about umbrellas versus ponchos; it’s about executing a plan that feels thoughtful and generous.
Umbrellas are the more elegant solution. The key is quantity and coordination. Wedding planning experts recommend having a supply of at least one umbrella for every two guests, plus individual umbrellas for each member of the wedding party. This ensures no one has to make a mad dash. Stationing staff or groomsmen at transition points to hand them out adds a touch of class. From a photographic perspective, there’s a specific recommendation: while many couples opt for colorful umbrellas to add a pop of fun, photographers often prefer clear or white ones. They don’t cast a color tint on faces and allow for more natural light in photos.
Some couples have turned this practical necessity into a memorable gift. Providing high-quality umbrellas, perhaps subtly branded or in a wedding color, as a wedding party gift or even a favor for all guests, is a wonderful touch. It ensures protection while creating fantastic group photo opportunities. Ponchos are a more casual and cost-effective alternative, best suited for more relaxed events. If you choose ponchos, opt for higher-quality, transparent versions and present them rolled up in baskets with a cute sign, rather than handing out flimsy plastic bags. The goal is to make your guests feel cared for, not like they’re preparing for a shipwreck.
How to Pivot the Vibe From “Sunny Garden” to “Cozy Candlelit” Instantly?
This is the moment where your Plan A-Prime truly comes to life. The “Atmospheric Pivot” is not about salvaging a rainy day; it’s about executing a deliberate shift to a completely different, but equally enchanting, mood. You are moving from the bright, airy energy of a garden party to the warm, intimate, and romantic glow of a candlelit haven. This pivot needs to be swift and decisive, transforming the space within minutes as guests move indoors.
Lighting is your most powerful tool. The instant shift in atmosphere is achieved by deploying a pre-staged lighting plan. This means having portable LED uplighting with warm amber filters ready to be switched on, and hundreds of candles and lanterns ready to be lit by a dedicated team. This should happen in the 15 minutes it takes for guests to transition spaces. The effect is magical: guests walk in from the damp outdoors into a room that feels like a warm, glowing embrace. This immediate sensory shift erases any disappointment about the change in plans.

Sound and comfort are the other key layers. Your playlist must pivot as well. Switch from the upbeat, outdoor-friendly music to an intimate jazz trio, a soulful acoustic set, or a curated playlist of sophisticated lounge music. This audibly signals a change in mood. Finally, small touches of physical comfort make a huge impact. Place baskets of soft, cozy blankets at the entrance for guests to wrap themselves in. Adapt your bar menu to include a warm signature cocktail, like a spiked hot cider or a classic hot toddy. These details work together to create an unforgettable, hygge-inspired experience that feels intentional and luxurious.
- Deploy portable LED lighting with warm filters to create instant ambiance.
- Have a dedicated team light pre-staged candles and lanterns throughout the space within 15 minutes.
- Switch the music playlist from upbeat garden party to intimate jazz or acoustic sets.
- Distribute cozy blankets in baskets at the entrance for guest comfort.
- Transition the bar menu to include warm signature cocktails.
- If in a large, high-ceilinged room, use fabric draping to create a more intimate, lowered ceiling effect.
Why “Month-Of” Coordination Often Costs More in Stress and Money?
Hiring a “month-of” coordinator can seem like a savvy, budget-friendly choice. The reality, especially when dealing with weather contingencies, is that this approach often costs you more in both stress and last-minute expenses. A month-of coordinator is a firefighter; they are dropped into a nearly-finished plan and tasked with executing it. They have no history with your vendors, no deep understanding of your original vision, and—most critically—no time to build a robust, integrated Plan A-Prime from the ground up.
When a rain forecast hits a week before the wedding, a coordinator who has been with you for months has already done the legwork. They’ve vetted the tent company, mapped out the indoor floor plan, and established communication protocols with every vendor. They are the architect of your contingency plan. A month-of coordinator, by contrast, is playing catch-up. They are trying to forge relationships and solve complex logistical puzzles under extreme pressure. This leads to miscommunication, overlooked details, and often, more expensive solutions because they lack the time to negotiate or find better options.
Effective rain planning requires seamless communication with guests and a unified front from all vendors. A coordinator’s role is to ensure signs are in place to direct guests, that the caterer is ready to serve in the tented area, and that the entertainment has the power and cover they need. As one vendor coordination case study highlights, this level of detail requires deep, pre-existing integration. A planner who is only there for the last 30 days simply cannot establish this level of operational command. The money you “save” on a partial planning package is often spent tenfold on rush fees, mistakes, and the immeasurable cost of your own stress in the final, critical days.
At What Wind Speed Does Al Fresco Dining Become Unsafe?
Rain is often accompanied by its more destructive partner: wind. While a light breeze can be pleasant, high winds pose a significant risk to guest comfort and safety at an outdoor event. Knowing the specific thresholds at which conditions shift from uncomfortable to dangerous is not a matter of opinion; it’s a critical safety calculation. Your decision to move indoors or add protective tent sidewalls must be based on data, not just a feeling.
Even moderate winds can wreak havoc on an outdoor reception. A 10-15 mph breeze is enough to blow out candles, send napkins flying, and make guests feel chilled. Once winds exceed 15 mph, you enter a zone of significant risk for your decor. Tall centerpieces can topple, lightweight signage becomes a projectile, and linens refuse to stay on tables. At this point, the guest experience is severely compromised. It is no longer an elegant dinner; it is a battle against the elements.
The absolute, non-negotiable threshold for safety is around 25 mph. At this speed, the structural integrity of even a professionally installed tent can be compromised. This is a mandatory evacuation scenario. As Deliece Knights, CEO of Dhalia Events, states, contingency planning isn’t just about shelter. In her expert opinion shared with The Knot, she emphasizes that in inclement weather, there are often requirements, not suggestions, for safety. She explains:
In the case of inclement weather, couples are usually required to spend and use sidewalls as well as erect additional tents and coverage options for their guests and vendors to get in and out of the space safely.
– Deliece Knights, CEO of Dhalia Events, The Knot
The following table, based on industry safety standards, provides clear action thresholds. It should be a core component of your risk assessment on the wedding day.
| Wind Speed | Guest Comfort Level | Safety Considerations | Recommended Action |
|---|---|---|---|
| 0-10 mph | Comfortable | Safe for all decor | Proceed as planned |
| 10-15 mph | Noticeable breeze | Secure lightweight items | Weight centerpieces, secure linens |
| 15-25 mph | Uncomfortable | Risk to tall centerpieces, loose items | Consider moving indoors, add tent sidewalls |
| 25+ mph | Dangerous | Tent structural concerns | Must move indoors immediately |
Key Takeaways
- Reframe your rain plan from a “Plan B” to a “Plan A-Prime”—a desirable, intimate alternative you design with intention.
- A non-refundable tent deposit is not a loss; it’s a crucial investment in certainty that saves you from exorbitant rush fees and logistical panic.
- Design your decor to be “weather-adaptive” with modular, portable, and durable elements that work beautifully both indoors and outdoors.
The “Greenhouse Effect”: Managing Heat in Clear-Span Marquees
You’ve successfully executed your Plan A-Prime and moved your guests into a beautiful clear-top tent. But another weather-related challenge can arise, even on a cloudy or intermittently sunny day: the “greenhouse effect.” A clear-span marquee can trap solar radiation, causing temperatures inside to soar to uncomfortable levels, turning your elegant refuge into a sweltering hothouse. Managing this heat is a final, crucial detail for ensuring guest comfort.
Effective heat management is about proactive design and ventilation. The orientation of the tent is your first line of defense; if possible, position it to minimize direct afternoon sun exposure on its longest side. A more effective strategy is to opt for a partially clear roof. Installing white-topped sections over the main dining or dancing areas can dramatically reduce heat gain while still allowing for beautiful ambient light through clear perimeter panels. Ventilation is also key. Rather than relying solely on expensive AC units, positioning multiple large fans to create cross-ventilation can be more effective and energy-efficient.
Finally, you can integrate heat management into your decor and timeline. Scheduling the most active parts of your event, like the ceremony or open dancing, for cooler morning or evening hours can make a big difference. Strategically placing large potted trees or fabric draping around the tent’s perimeter can create additional shade. And a beautifully styled hydration station, with large glass dispensers of fruit-infused ice water, becomes both a functional necessity and a chic decor element. These strategies ensure your tented celebration remains a comfortable and enjoyable experience for everyone.
- Orient the tent to minimize afternoon sun exposure on the longest side.
- Install white-topped sections instead of a fully clear roof to reduce heat.
- Use multiple fans to create cross-ventilation.
- Schedule high-energy activities for cooler parts of the day.
- Create external shade with large potted trees or fabric panels.
- Set up stylish hydration stations as functional decor.
By embracing a proactive, strategic mindset, you can design a rain plan that is not a source of dread, but a powerful tool to guarantee a beautiful, intimate, and stress-free wedding day. The next logical step is to discuss these contingency strategies with your planner and key vendors to build your own “Plan A-Prime”.