Transforming a generic ballroom is not about hiding flaws, but about architecturally reshaping the space with light and structure to manipulate perception.
- Light can be used to sculpt walls and create “virtual wallpaper,” completely changing a room’s texture and feel without a single piece of fabric.
- Dividing a large, open room into distinct “micro-environments” for lounging, dining, and dancing creates intimacy, flow, and visual interest.
Recommendation: Think like a set designer. Focus on the guest’s psychological experience of the space and use production elements to tell a story, turning that boring box into a bespoke world.
You found it. The perfectly located, perfectly priced hotel ballroom that ticks all the logistical boxes for your wedding. There’s just one problem: you hate it. The swirly patterned carpet, the beige vinyl walls, the generic chandeliers—it’s the antithesis of the unique, personal celebration you envision. The common advice is to throw money at the problem with wall-to-wall draping and aggressive uplighting, hoping to bury the blandness under layers of fabric and color. This approach treats the venue as a flaw to be concealed.
But what if the goal wasn’t to cover up, but to rebuild perception? To think not like a decorator, but like a set designer on an empty stage? A set designer doesn’t just add props; they manipulate light, form, and focus to create a world, evoke emotion, and direct the audience’s experience. A generic ballroom is your blank canvas—a “black box” theatre waiting for its scenography. The key isn’t to hide the architecture, but to impose a new one upon it using the tools of production design.
This guide moves beyond simple decoration. We will deconstruct the principles of spatial transformation, exploring how to command a room’s atmosphere through psychological design, architectural lighting, and structural storytelling. We will analyze how to change a room’s perceived size, how to erase ugly walls with light instead of fabric, and how to build immersive experiences within a single space. It’s time to stop decorating the box and start redesigning the world inside it.
For those who prefer a visual introduction to the power of lighting, the following video demonstrates the basic principles of uplighting. While the context is for holidays, the technique of painting walls with light is a fundamental tool in the event designer’s kit.
To fully grasp how these theatrical techniques apply to a wedding venue, this article is structured around the core strategies a production designer uses. The following summary outlines the key areas we will explore to transform your space from a generic hall into a personal statement.
Summary: A Production Design Blueprint for Your Ballroom Wedding
- Why Changing the Focal Point Can Make a Large Hall Feel Intimate?
- How to Hide Ugly Venue Carpets and Walls Without full Draping?
- Custom Fabricated Backdrops vs. Rentals: Which Is Best for Your Vision?
- The Ceiling Height Mistake That Makes Luxury Decor Look Cheap
- How to Create “Micro-Environments” Within One Large Reception Space?
- How to Use Silk Chiffon Drapery to Soften Industrial Venue Architecture?
- How to Transform Your Venue Walls With Strategic LED Uplighting?
- How to Personalize Your Reception With a Custom Vinyl Dance Floor Wrap?
Why Changing the Focal Point Can Make a Large Hall Feel Intimate?
A cavernous ballroom feels impersonal not because of its size, but because it lacks a human-scale focal point. Without a clear place for the eye to rest, guests feel exposed and disconnected. The solution lies in a core principle of environmental psychology: Prospect-Refuge Theory. This theory suggests humans are inherently drawn to spaces that offer both a clear, open view (prospect) and a sense of protected enclosure (refuge). A large, empty hall offers only prospect, creating a subtle feeling of vulnerability. By creating a strong, visually dominant focal point—like a dramatic custom backdrop, a lushly decorated head table, or a central lounge area—you provide a “refuge” for the eye.
This isn’t just theory; it’s a foundational element of architectural design. A case study on the work of Frank Lloyd Wright demonstrates how he masterfully used variations in ceiling height and strategic openings to create feelings of both expansive view and cozy shelter within his homes. Your ballroom is a single-volume space, so you must create these variations artificially. A grand floral arch doesn’t just look pretty; it creates a psychological destination. It draws guests in and makes the vastness of the room feel intentional rather than empty. The goal is to give the brain a “home base” to return to, which in turn makes the entire space feel more manageable and intimate.
By shifting focus from decorating every table equally to over-investing in one or two key areas, you command attention and define the space. This singular, powerful statement gives the room a heart, transforming it from a featureless hall into a purposeful environment. It tells guests where the most important moments will happen and provides a visual anchor that makes the scale of the room feel grand, not overwhelming.
How to Hide Ugly Venue Carpets and Walls Without full Draping?
Full draping is the brute-force solution to ugly walls, but it’s expensive, labor-intensive, and often shrinks the perceived size of the room. A set designer’s approach is more surgical: use light to reshape and resurface. Instead of concealing a wall, you can completely dematerialize it or give it a new “skin” using strategic lighting techniques. This is the art of architectural illusion, turning a liability into a dynamic feature. One of the most effective methods is “wall grazing,” where lighting fixtures are placed very close to a surface, aimed at a steep angle. This technique magnifies the wall’s natural texture, creating dramatic highlights and shadows that can turn a flat, boring surface into a rich, textural element.
To take this further, you can project patterns onto the walls using a gobo projector. A gobo is essentially a stencil for light, allowing you to cast everything from delicate floral motifs to bold geometric patterns. This creates a “virtual wallpaper” that can be customized to your theme, completely overriding the venue’s existing finish without touching it. This technique is not only visually stunning but also highly efficient; a study of modern LED technology shows that 75 LED uplights use about as much power as a typical hair dryer, making large-scale transformations surprisingly accessible.
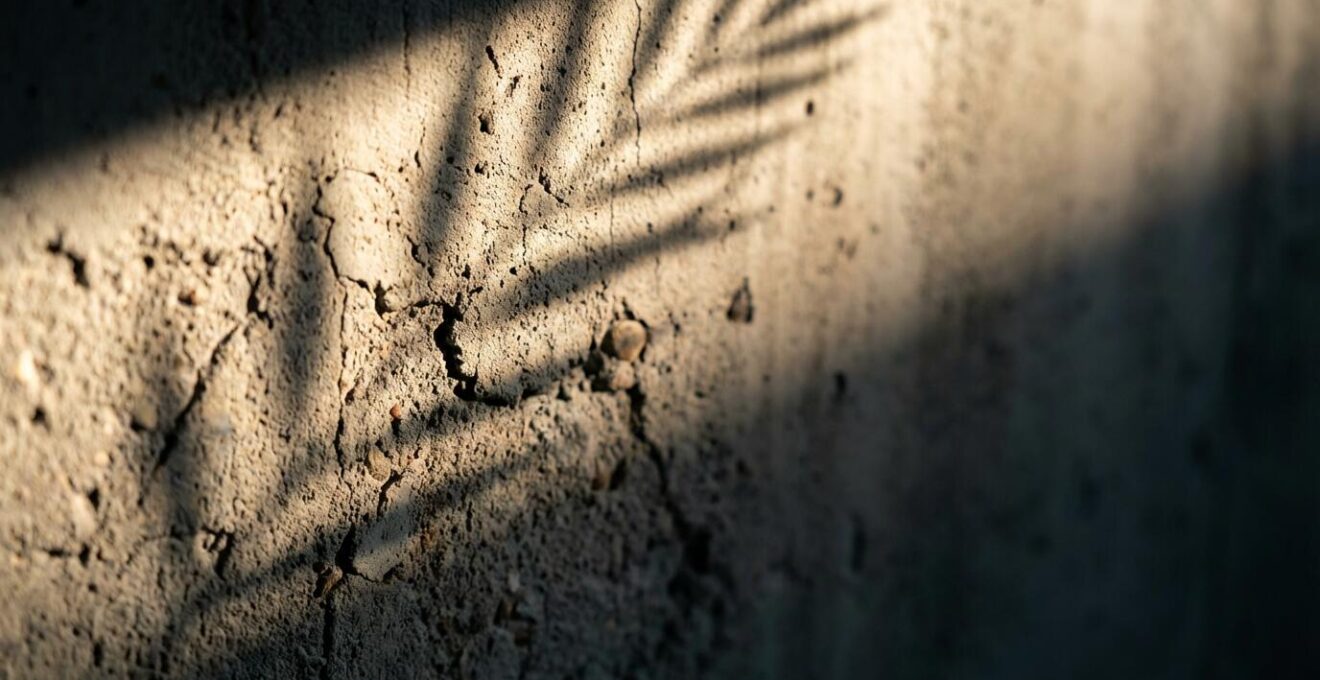
This image perfectly illustrates the concept. The raking light creates deep, dramatic texture where none was visible before, while the projected pattern adds a layer of intricate detail. For ugly carpets, the solution is similar: draw the eye upward. By concentrating your lighting design on the walls and ceiling and keeping the table lighting intimate and focused, the floor falls into shadow and becomes secondary. You’re not hiding the carpet; you’re simply making it irrelevant by creating more compelling visual information elsewhere.
Custom Fabricated Backdrops vs. Rentals: Which Is Best for Your Vision?
A backdrop is more than a background for photos; it is the stage for the most important moments of your wedding. It can serve as the ceremony altar, the frame for your head table, or the anchor for your dance floor. The decision between a custom-fabricated piece and a standard rental is a critical one, balancing budget, logistics, and the desire for exclusivity. A custom build offers unparalleled opportunity for personalization—it can be any shape, size, or material, and can incorporate unique elements that tell your story. It is a piece of installation art created just for you. This option is ideal for couples with a highly specific vision that cannot be met by off-the-shelf products.
Rentals, on the other hand, offer a cost-effective and logistically simpler solution. Rental companies have a curated inventory of popular structures like arches, floral walls, and shelving units. While you sacrifice uniqueness, you benefit from proven designs and significantly lower costs. The “hybrid” approach offers a middle ground, where a standard rental structure is customized with bespoke elements like unique florals, custom signage, or integrated lighting. This can be a smart way to achieve a personalized look without the cost and complexity of a full custom build.
To make the right choice, you must weigh your priorities. The following table breaks down the key decision factors, drawing from industry data on wedding production costs and logistics. As this comparative analysis from wedding experts shows, the choice impacts everything from your budget to your setup timeline.
| Criteria | Custom Fabrication | Standard Rental | Hybrid Approach |
|---|---|---|---|
| Cost Range | $3,000-$15,000+ | $500-$2,000 | $1,500-$5,000 |
| Exclusivity Factor | 100% Unique | Standard Options | 70% Unique |
| Setup Time | 4-8 hours | 1-2 hours | 2-4 hours |
| Structural Support | Engineered for heavy elements | Limited weight capacity | Reinforced rental base |
| Venue Restrictions | Free-standing options available | May need wall attachments | Adaptable to restrictions |
Ultimately, if your goal is a “wow” moment that is 100% you, custom fabrication is the answer. If you are working within a tighter budget or have a more classic vision, a high-quality rental can be just as effective. The key is to choose the option that best serves your overall design narrative.
The Ceiling Height Mistake That Makes Luxury Decor Look Cheap
One of the most common design mistakes in a ballroom is ignoring the vertical space. When a room has high ceilings (15 feet or more), decor that is kept at or below eye level—like standard floral centerpieces—can look dwarfed and insignificant. The vast, empty space above creates a visual disconnect, making even the most luxurious elements feel small and cheap. This is because our perception of an environment is holistic; spatial psychology research confirms that the volume of a space directly impacts our psychological reaction to it. An unbalanced volume feels unsettling.
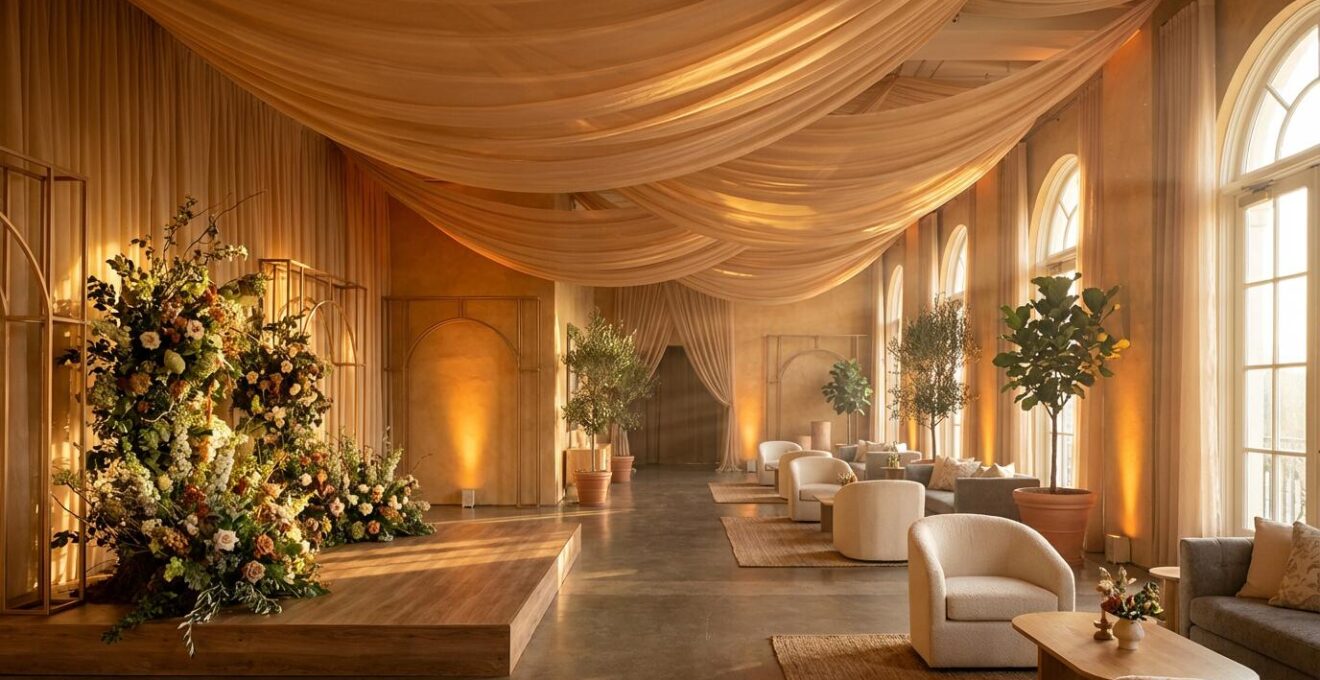
To create a cohesive and high-impact design, you must draw the eye upward and activate the full height of the room. This creates a sense of grandeur and intentionality. Tall centerpieces with ascending branches, suspended floral installations, or dramatic ceiling drapery are not just add-ons; they are essential architectural elements in a tall room. They serve to connect the “living space” of the guests with the architectural shell of the venue. By filling the vertical plane, you make the design feel immersive and complete, rather than like a few small decorations sitting at the bottom of a large box.
Ceiling treatments are particularly effective. Fabric swags can lower the perceived ceiling height to create a more intimate atmosphere, while twinkle lights woven into the drapery add a magical, starry-night effect. Even without draping, using lighting to project patterns or a soft color wash onto the ceiling adds depth and interest, preventing it from becoming a forgotten void. The goal is to create a design that is proportional to the space it inhabits.
Your Action Plan: Mastering Vertical Proportions
- Assess Vertical Volume: Measure or confirm the ceiling height. If it’s over 12 feet, make vertical elements a non-negotiable part of your design budget.
- Consult the Venue: Ask your venue coordinator about their specific rules for rigging points, ceiling drapery, and suspended installations before you book any vendors.
- Design for Scale: Work with your florist or designer to create tall centerpieces or suspended elements that occupy the upper third of the room’s volume.
- Incorporate Vertical Lighting: Plan for lighting elements that draw the eye up, such as uplighting on tall architectural features or gobo projections on the ceiling.
- Balance the Elements: Ensure your vertical decor is balanced. If you have a large suspended installation, you may opt for lower centerpieces to avoid visual clutter, and vice-versa.
How to Create “Micro-Environments” Within One Large Reception Space?
A single, large ballroom can feel monotonous for a five-hour event. To keep guests engaged and comfortable, a set designer thinks in terms of creating a journey through different spaces. The strategy is to break the large room into smaller, distinct zones or “micro-environments,” each with its own purpose and atmosphere. This creates visual interest, encourages movement, and provides different energy levels for your guests. You can create a high-energy dance floor, a chic and relaxed lounge area, and an elegant dining space, all within the same four walls.
The key to defining these zones without building actual walls is the strategic use of lighting, furniture, and low-profile dividers. For example, a lounge area can be defined by grouping sofas and armchairs on a large area rug, lit with warm, low-level lamps to create a cozy, conversational pocket. The bar area can be washed in a cool, vibrant color to signal a more social, high-energy zone. As detailed in a case study on reception lighting, bold lighting choices like colored uplighting and patterns are fundamental to making a party feel magical and to delineating different functional areas.
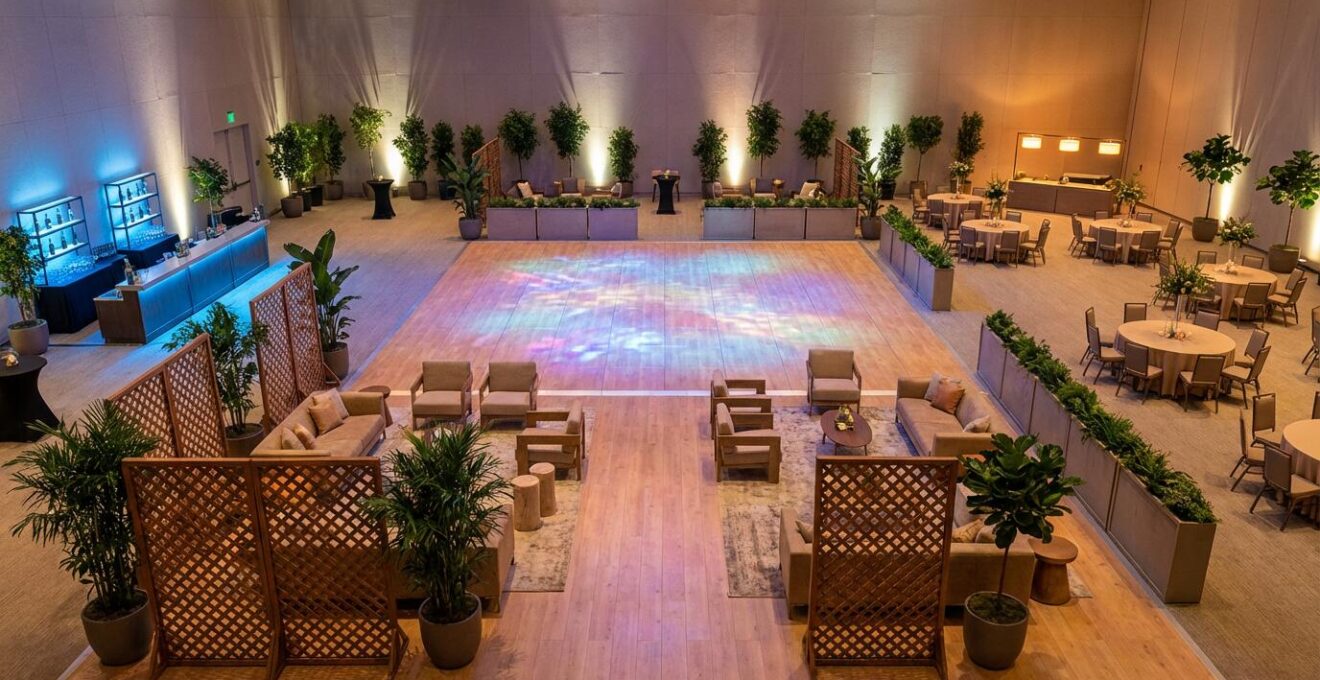
This aerial view shows the concept in action. The central dance floor acts as a “public square,” while surrounding areas are transformed into intimate “neighborhoods.” Low, decorative screens or rows of tall potted plants can act as semi-permeable walls, defining spaces without completely blocking sightlines and flow. This approach turns your reception from a static dinner into a dynamic, multi-zoned experience, allowing guests to choose their own adventure throughout the evening.
How to Use Silk Chiffon Drapery to Soften Industrial Venue Architecture?
Industrial venues—with their exposed brick, steel beams, and concrete floors—offer a beautifully raw and modern aesthetic. However, their hard surfaces and masculine energy can sometimes feel cold or stark for a wedding. The goal is not to hide this architecture, but to create a dialogue with it. Introducing soft, flowing fabrics like silk chiffon creates a powerful juxtaposition of textures that enhances both elements. The softness of the fabric makes the industrial elements feel more intentional and romantic, while the raw architecture gives the delicate drapery a dramatic, high-fashion context.
Instead of creating a uniform “tent” of fabric, think sculpturally. Wrap a single raw steel column in a spiral of chiffon to turn it into a soft, elegant pillar. Swag fabric asymmetrically across a ceiling, allowing it to interact with exposed ductwork rather than hiding it. Use long, flowing panels of chiffon to frame a grand entrance or create a ceremony backdrop against a weathered brick wall. This interplay is psychologically potent; environmental psychology research indicates that the context in which we encounter materials dramatically affects our perception of them. The contrast makes each material more intensely itself.
The choice of fabric is crucial. Silk chiffon is ideal because of its translucence. It catches the light beautifully and maintains a sense of airiness, softening the space without making it feel heavy or enclosed. It allows the architecture behind it to remain visible, creating layers of visual information. This is a sophisticated design choice that celebrates the character of the venue while infusing it with the romance and softness appropriate for a wedding. It’s about finding harmony in contrast, not erasing the venue’s unique identity.
Key Takeaways
- Think Architecturally, Not Decoratively: Your primary goal is to reshape the guest’s perception of the space’s dimensions, focal points, and textures.
- Use Light as a Primary Tool: Light is your most powerful and flexible instrument. Use it to sculpt surfaces, create boundaries, paint “virtual wallpaper,” and direct attention.
- Design for Psychological Comfort: Create intimacy in large spaces by establishing clear focal points (refuge) and breaking the room into smaller, human-scale micro-environments.
How to Transform Your Venue Walls With Strategic LED Uplighting?
Basic uplighting—placing a few colored lights around a room—is a common practice, but it often looks amateurish and dated. The transformative power of LED uplighting is unlocked when you think like a lighting designer, using it to tell a story and sculpt the environment. It’s not about flooding a room with a single color, but about using a dynamic, layered approach. A key trend is dynamic lighting programming, where the color, intensity, and even movement of the lights change throughout the event to match the mood of each moment.
A case study on modern wedding lighting highlights this shift toward immersive experiences. It notes, “Color-changing effects create seamless transitions in lighting color to match different moments, such as switching from warm, amber hues for dinner to vibrant shades for dancing.” This programming creates a narrative arc for your reception. The lighting can be soft and romantic during the ceremony, warm and inviting during dinner, and then transition to pulsing, vibrant colors to energize the dance floor. This isn’t just decoration; it’s a living element of your event. Furthermore, you can use gobo projectors to add another layer of texture. As one professional guide explains:
A gobo (or GOBO) derived from ‘Go-Between’ or ‘Goes Before Optics’ is a physical template slotted inside, or placed in front of, a lighting source, used to control the shape of emitted light.
– Just Koolen Entertainment, Professional Event Lighting Guide
This technology allows you to cast intricate, moving patterns across the walls, adding a mesmerizing sense of energy and depth. The combination of a base layer of colored uplight with a top layer of patterned gobo projection and dynamic programming can turn four blank walls into a completely immersive and responsive environment that evolves with your celebration. The wall ceases to be a static boundary and becomes a canvas for a light show designed exclusively for you.
How to Personalize Your Reception With a Custom Vinyl Dance Floor Wrap?
The dance floor is the heart of the reception, the stage where the celebration culminates. Leaving it as the venue’s standard parquet square is a missed opportunity for a major design statement. A custom vinyl dance floor wrap is one of the most impactful ways to personalize your space, transforming a functional area into the centerpiece of your design. This is your chance to literally anchor your wedding’s visual theme to the floor. While monograms and initials are a classic choice, the potential for creativity is limitless. A set designer would see this as an opportunity for narrative scenography.
Imagine a dance floor wrapped in a celestial map of the night sky from your first date, or a floral pattern that seems to “grow” from the entrance and blossom across the floor. You could mirror a pattern from your invitations or even create an abstract watercolor wash that pulls together all your wedding colors. This element ties the entire room together and provides a stunning, high-impact visual that guests will be talking about long after the wedding. It turns the floor from a negative space into an active, storytelling canvas.
From a practical standpoint, choosing the right material is key to ensuring both beauty and safety. High-quality vinyls come with slip-resistance ratings to keep your guests safe, and professional installation is crucial for a seamless, bubble-free finish. The following table outlines the key considerations for different material types, helping you balance cost, durability, and installation complexity.
| Material Type | Slip Resistance Rating | Installation Time | Removal Process | Average Cost/sq ft |
|---|---|---|---|---|
| Premium Vinyl | R10-R11 | 3-4 hours | Professional removal required | $8-12 |
| Removable Adhesive | R9-R10 | 2-3 hours | DIY possible | $5-8 |
| Interlocking Tiles | R11-R12 | 4-5 hours | Simple disassembly | $10-15 |
By investing in a custom wrap, you are not just decorating; you are commissioning a piece of large-format graphic art that defines your entire reception space. It’s a bold, confident design move that demonstrates a commitment to a fully realized creative vision.
Now that you have the tools to think like a set designer, the next step is to start sketching out your own vision. Begin by identifying the core story or feeling you want your wedding to convey, and then select the production elements—be it lighting, a custom structure, or a narrative dance floor—that will best bring that story to life.